

Huawei
The SmartgridOne Controller supports Huawei SUN2000 inverters, LUNA 2000 batteries and the SmartLogger 3000. The controller auto-detects whether a SmartLogger is present, so in most cases it just works. The installer should prepare the Huawei side and then run the search wizard on the SmartLogger IP address. If no Smartlogger is placed, run the wizard on each inverter's IP address.
This guide walks you through it:
- Identify your setup — SmartLogger or direct
- Wiring
- Configure the Huawei equipment
- Add the system in the controller
Supported devices
| Device Type | Modbus TCP (Ethernet) | RS485 | Curtailment |
|---|---|---|---|
| Huawei SmartLogger 3000 | ✅ | ❌ | ✅ |
| Huawei SUN2000 Series inverters | ✅ | ||
| Huawei LUNA 2000 battery | — |
The SmartLogger 1000a is on the roadmap but not yet supported. Practically all SUN2000 inverters with a communication interface are supported (including the SUN2000L residential range) — not every interface is present on every inverter, so check yours.
Show all supported SUN2000 models
- SUN2000-100KTL-H0
- SUN2000-100KTL-H1
- SUN2000-100KTL-H2
- SUN2000-100KTL-INM0
- SUN2000-100KTL-M0
- SUN2000-100KTL-M1
- SUN2000-100KTL-USH0
- SUN2000-105KTL-H1
- SUN2000-10KTL
- SUN2000-10KTL-M0
- SUN2000-10KTL-M1
- SUN2000-10KTL-M2
- SUN2000-10KTL-USL0
- SUN2000-11.4KTL-USL0
- SUN2000-110KTL-M0
- SUN2000-125KTL-JPH0
- SUN2000-125KTL-M0
- SUN2000-12KTL
- SUN2000-12KTL-M0
- SUN2000-12KTL-M1
- SUN2000-12KTL-M2
- SUN2000-15KTL
- SUN2000-15KTL-M0
- SUN2000-15KTL-M2
- SUN2000-15KTL-M3
- SUN2000-168KTL-H1
- SUN2000-175KTL-H0
- SUN2000-17KTL
- SUN2000-17KTL-M0
- SUN2000-17KTL-M2
- SUN2000-17KTL-M3
- SUN2000-185KTL-H1
- SUN2000-185KTL-INH0
- SUN2000-193KTL-H0
- SUN2000-196KTL-H0
- SUN2000-196KTL-H1
- SUN2000-196KTL-H3
- SUN2000-200KTL-H2
- SUN2000-20KTL
- SUN2000-20KTL-M0
- SUN2000-20KTL-M2
- SUN2000-20KTL-M3
- SUN2000-215KTL-H0
- SUN2000-22KTL-US
- SUN2000-23KTL
- SUN2000-23KTL-M3
- SUN2000-24.5KTL
- SUN2000-24.5KTL-M3
- SUN2000-24.7KTL-JP
- SUN2000-25KTL-NAM3
- SUN2000-25KTL-US
- SUN2000-28KTL
- SUN2000-28KTL-M3
- SUN2000-29.9KTL
- SUN2000-29.9KTL-M3
- SUN2000-2KTL-L0
- SUN2000-2KTL-L1
- SUN2000-3.68KTL-L10
- SUN2000-3.8KTL-USL0
- SUN2000-30KTL-A
- SUN2000-30KTL-M3
- SUN2000-30KTL-NAM3
- SUN2000-30KTL-US
- SUN2000-33KTL
- SUN2000-33KTL-A
- SUN2000-33KTL-E001
- SUN2000-33KTL-JP
- SUN2000-33KTL-NAM3
- SUN2000-33KTL-NHM3
- SUN2000-33KTL-US
- SUN2000-36KTL
- SUN2000-36KTL-M3
- SUN2000-36KTL-NAM3
- SUN2000-36KTL-US
- SUN2000-3KTL-CNL0
- SUN2000-3KTL-L0
- SUN2000-3KTL-L1
- SUN2000-3KTL-M0
- SUN2000-3KTL-M1
- SUN2000-4.6KTL-L1
- SUN2000-4.95KTL-JPL0
- SUN2000-4.95KTL-JPL1
- SUN2000-40KTL
- SUN2000-40KTL-JP
- SUN2000-40KTL-M3
- SUN2000-40KTL-NAM3
- SUN2000-40KTL-NHM3
- SUN2000-40KTL-US
- SUN2000-42KTL
- SUN2000-42KTL-M3
- SUN2000-43KTL-IN-C1
- SUN2000-43KTL-INM3
- SUN2000-44KTL-M3
- SUN2000-45KTL-US-HV-D0
- SUN2000-4KTL-CNL0
- SUN2000-4KTL-L0
- SUN2000-4KTL-L1
- SUN2000-4KTL-M0
- SUN2000-4KTL-M1
- SUN2000-50KTL
- SUN2000-50KTL-C1
- SUN2000-50KTL-JPM0
- SUN2000-50KTL-JPM1
- SUN2000-50KTL-M0
- SUN2000-50KTL-M3
- SUN2000-55KTL-HV-D1
- SUN2000-55KTL-HV-D1-001
- SUN2000-55KTL-IN-HV-D1
- SUN2000-5KTL-CNL0
- SUN2000-5KTL-L0
- SUN2000-5KTL-L1
- SUN2000-5KTL-M0
- SUN2000-5KTL-M1
- SUN2000-5KTL-USL0
- SUN2000-60KTL-HV-D1
- SUN2000-60KTL-HV-D1-001
- SUN2000-60KTL-M0
- SUN2000-63KTL-JPH0
- SUN2000-63KTL-JPM0
- SUN2000-65KTL-M0
- SUN2000-6KTL-CNL0
- SUN2000-6KTL-L1
- SUN2000-6KTL-M0
- SUN2000-6KTL-M1
- SUN2000-7.6KTL-USL0
- SUN2000-70KTL-C1
- SUN2000-70KTL-INM0
- SUN2000-75KTL-C1
- SUN2000-8KTL
- SUN2000-8KTL-M0
- SUN2000-8KTL-M1
- SUN2000-8KTL-M2
- SUN2000-90KTL-H0
- SUN2000-90KTL-H1
- SUN2000-90KTL-H2
- SUN2000-95KTL-INH0
- SUN2000-95KTL-INH1
- SUN2000-9KTL-USL0
- SUN2000L-2KTL
- SUN2000L-3.68KTL
- SUN2000L-3KTL
- SUN2000L-3KTL-CN
- SUN2000L-3KTL-CN-4G
- SUN2000L-4.125KTL-JP
- SUN2000L-4.6KTL
- SUN2000L-4.95KTL-JP
- SUN2000L-4KTL
- SUN2000L-4KTL-CN
- SUN2000L-4KTL-CN-4G
- SUN2000L-5KTL
- SUN2000L-5KTL-CN
- SUN2000L-5KTL-CN-4G
- SUN8000-500KTL
1. Identify your setup
The controller scans for a SmartLogger when it connects and adapts automatically. What you do need to know is which IP address to run the search wizard on, because that differs per setup:
| If the site has… | Run the search wizard on… | The inverters are then… |
|---|---|---|
| A SmartLogger 3000 | the SmartLogger's IP address (one search) | automatically added via the SmartLogger; all curtailment and/or battery control goes through the SmartLogger. |
| No SmartLogger | each inverter's IP address (one search per inverter) | controlled directly |
Belangrijk
If the site has a SmartLogger, add the system only on the SmartLogger's IP address. The SmartLogger already exposes every inverter and meter connected to it, so they are all found in one go. Do not add the inverters one by one on their individual IP addresses — this is the most common setup mistake.
Routing all control through the SmartLogger (instead of the individual inverters) is intentional: it prevents two systems from controlling the same inverters. You still get the measurements of every inverter individually — "monitoring-only" means control is centralised through the SmartLogger, not that any data is lost. This works over both Ethernet (Modbus-TCP) and RS485.
2. Wiring
Ethernet — follow the guidelines for ethernet wiring.
RS485 wiring (only when using RS485 on SUN2000 / LUNA 2000!)
RS485 Wiring
- For correct RS485 wiring: Follow the guidelines for RS485 wiring.
- If the wiring shown in the table below is incorrect, please let us know.
- There is no general consensus in the industry about the usage of A and B for the RS485 polarity, so it may be counterintuitive and opposite of what you might expect for some devices.
| Device | SmartgridOne Controller model OM1 | SmartgridOne Controller model IG8 | RS485-USB converter | RS485-Ethernet converter |
|---|---|---|---|---|
| RS485 A | RS485_POS | RS485 A | TX+ | |
| RS485 B | RS485_NEG | RS485 B | TX- | |
| RS GND | GND | Not available | G |
3. Configure the Huawei equipment
We recommend doing a factory reset of the inverter before adding it — this gives a clean initial connection and avoids many issues. Then follow the section that matches your setup.
With a SmartLogger 3000
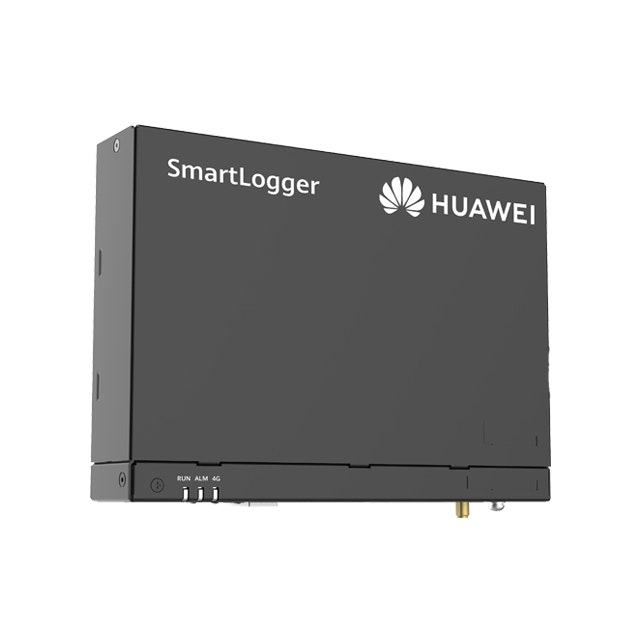
The SmartLogger reads and controls all of the energy meters, inverters and batteries connected to it. Configure it in its web interface (browse to its IP address, default password "Changeme").
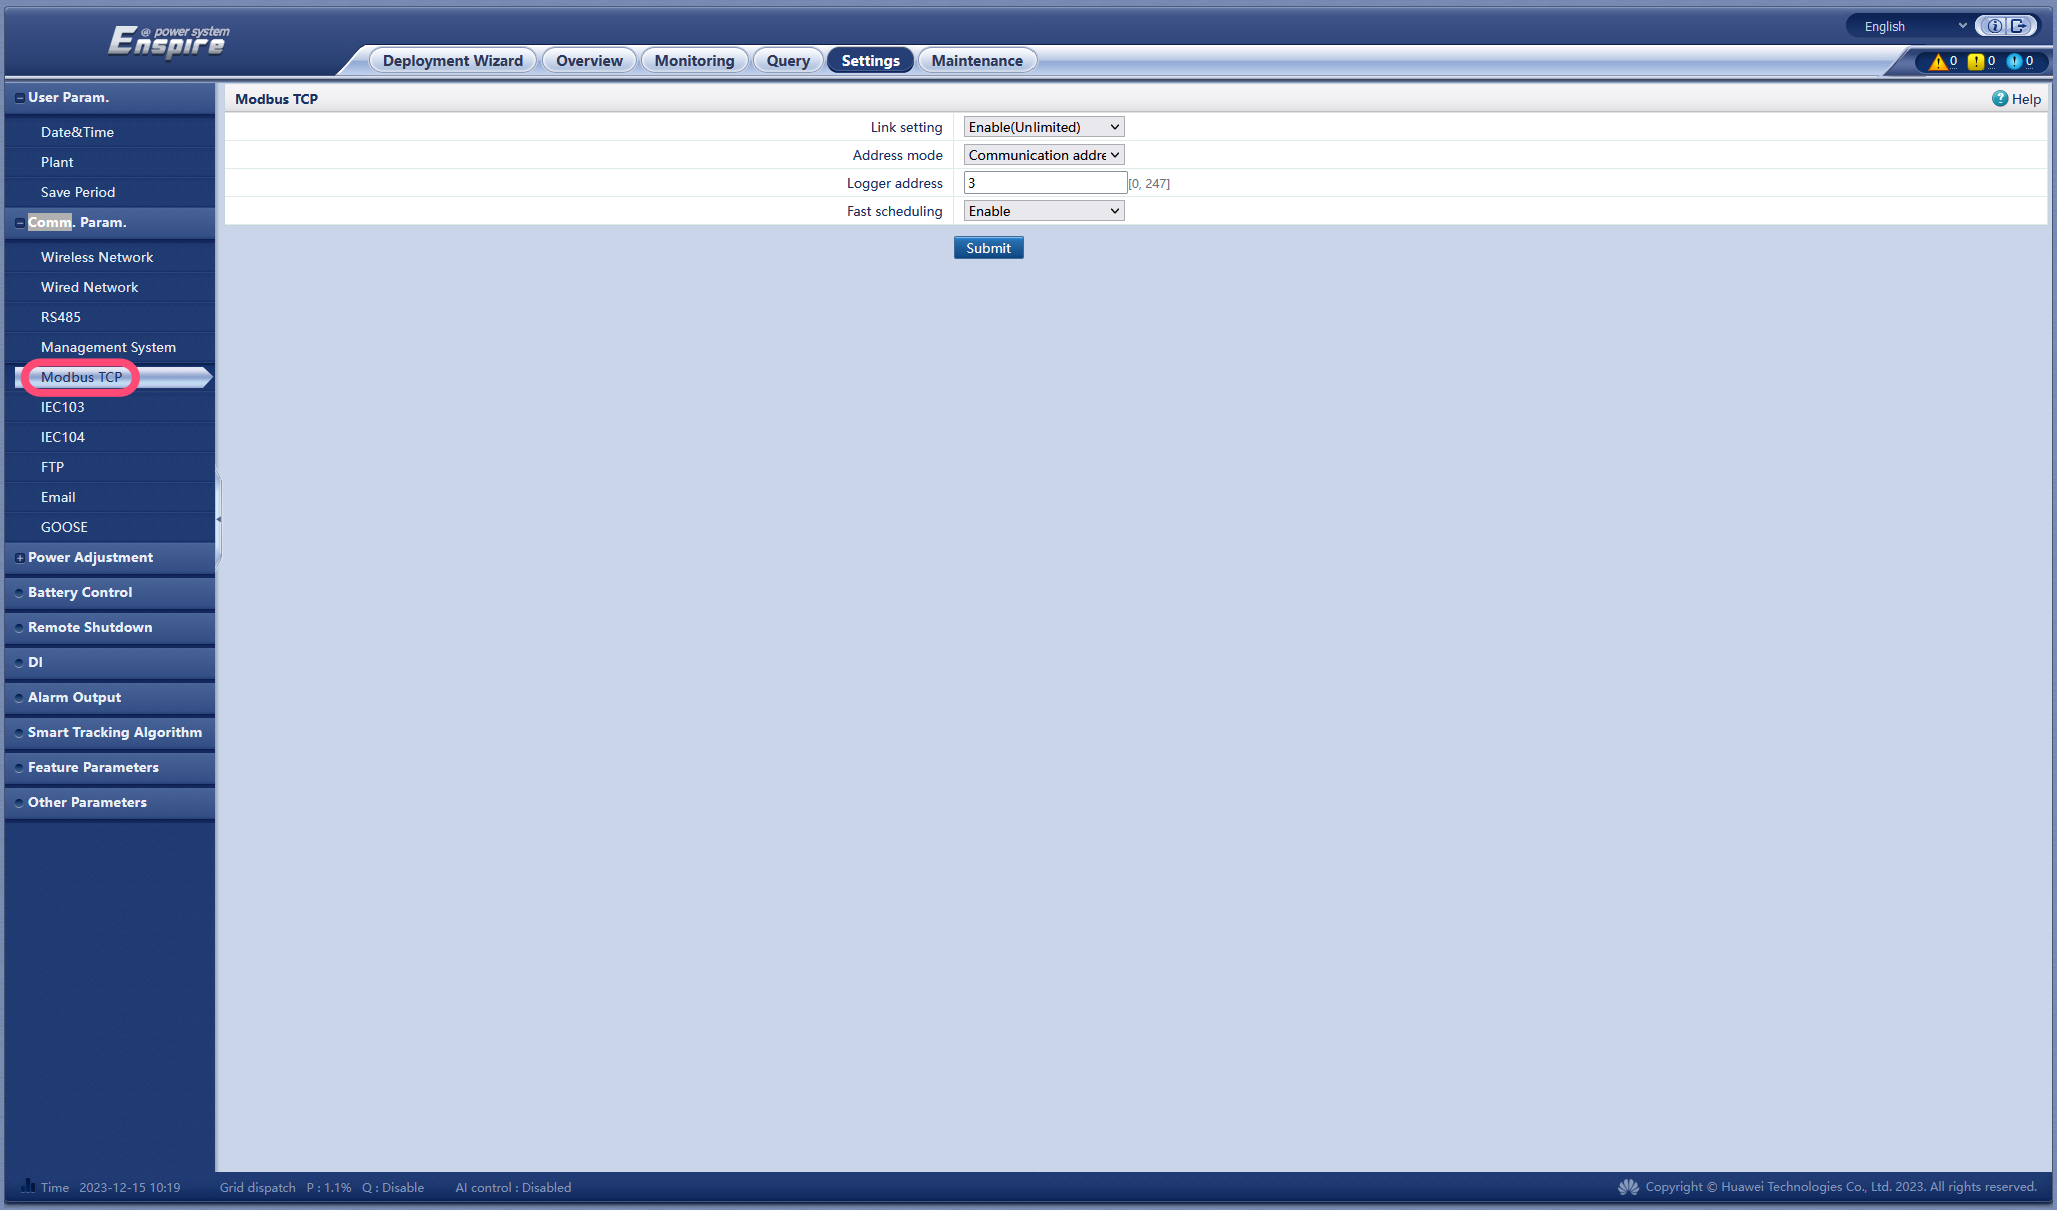
a. Enable Modbus
- Change "Link setting" to Enable (Unlimited).
- Set "Address mode" to Communication address.
- Choose the Modbus address of the logger — make it different from the inverter addresses (see the next step).
- Click submit.
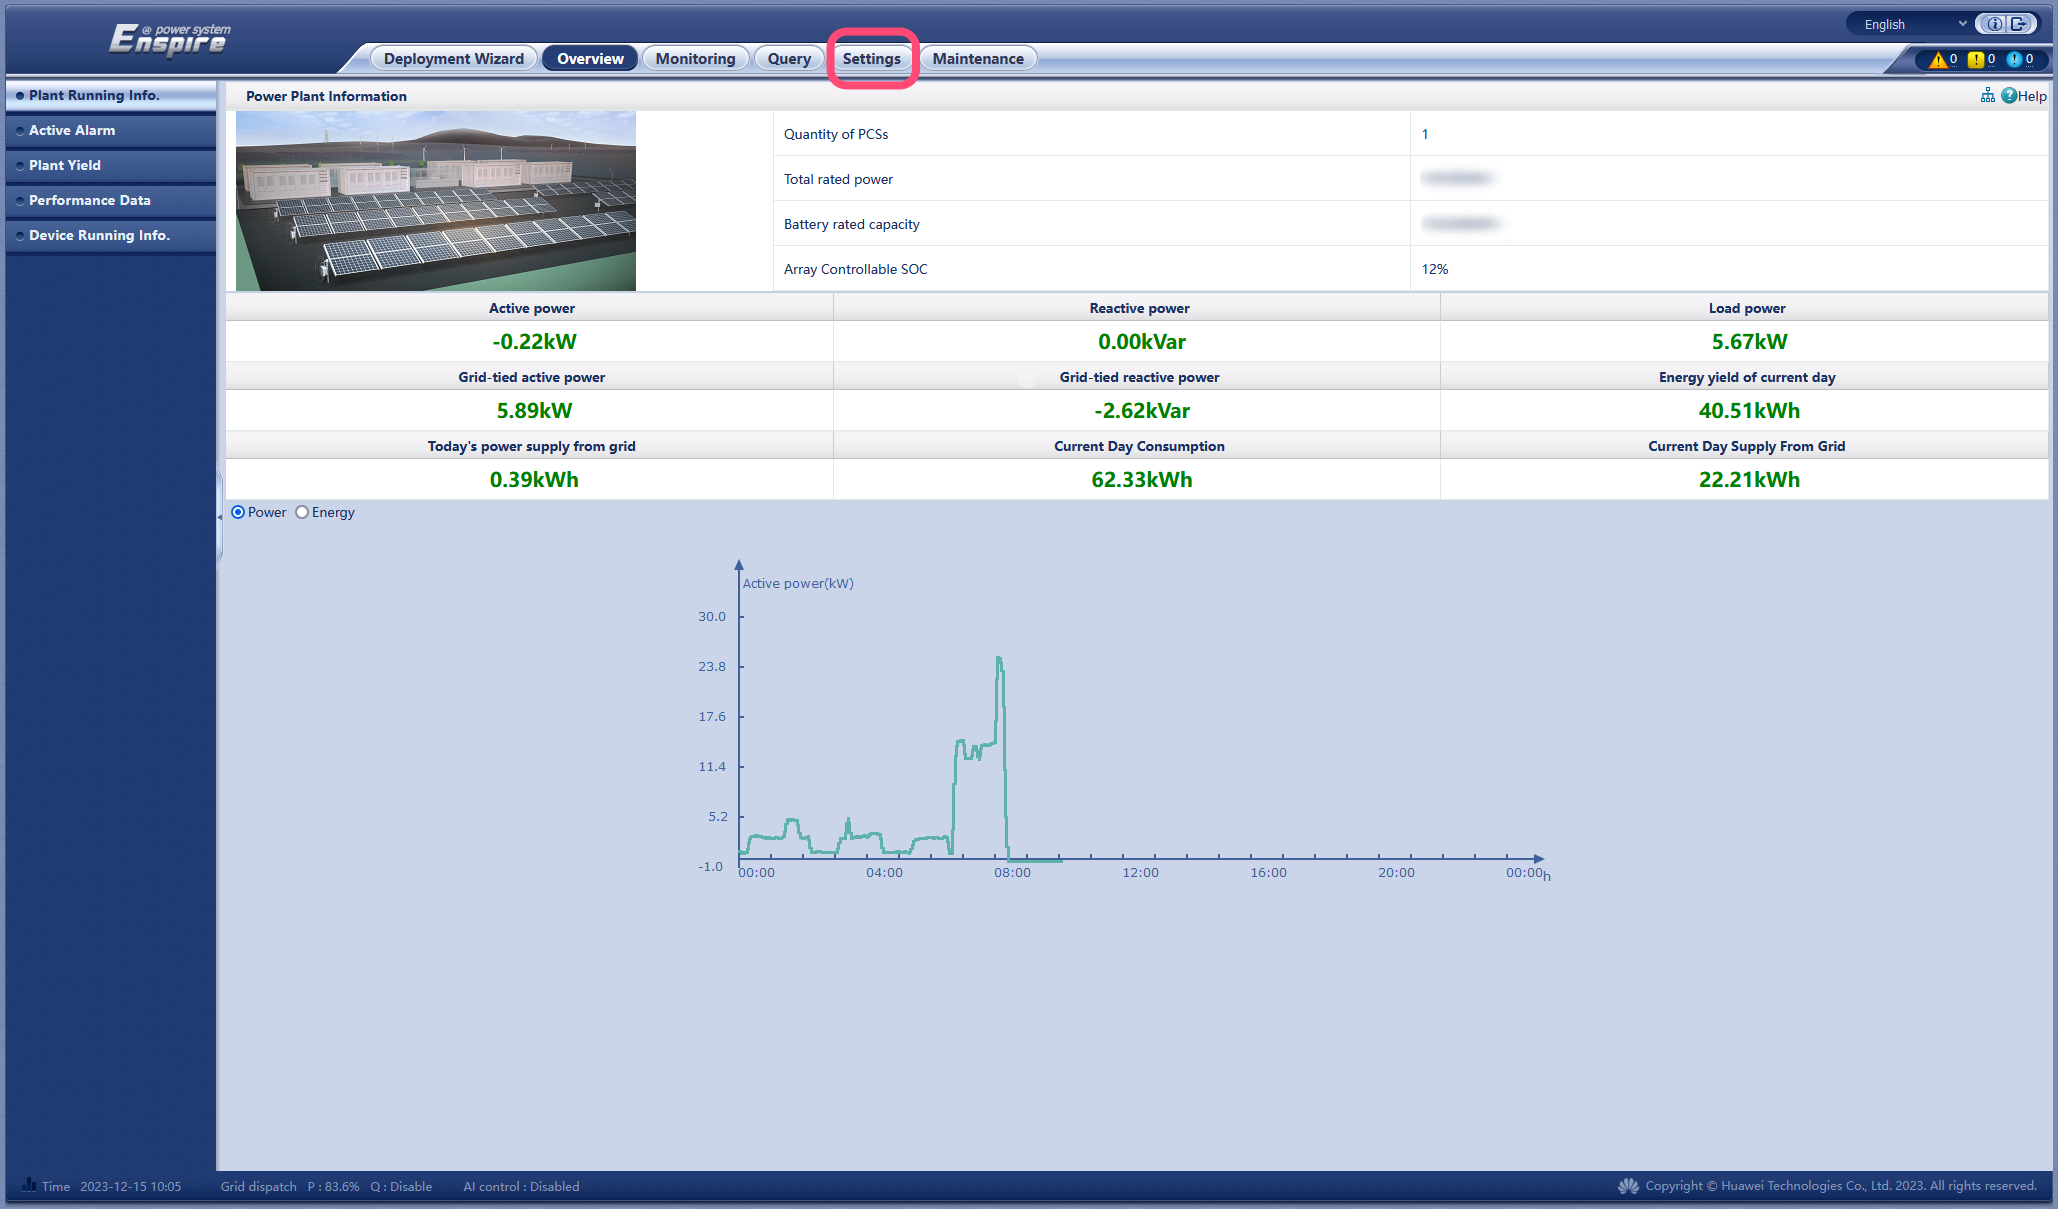
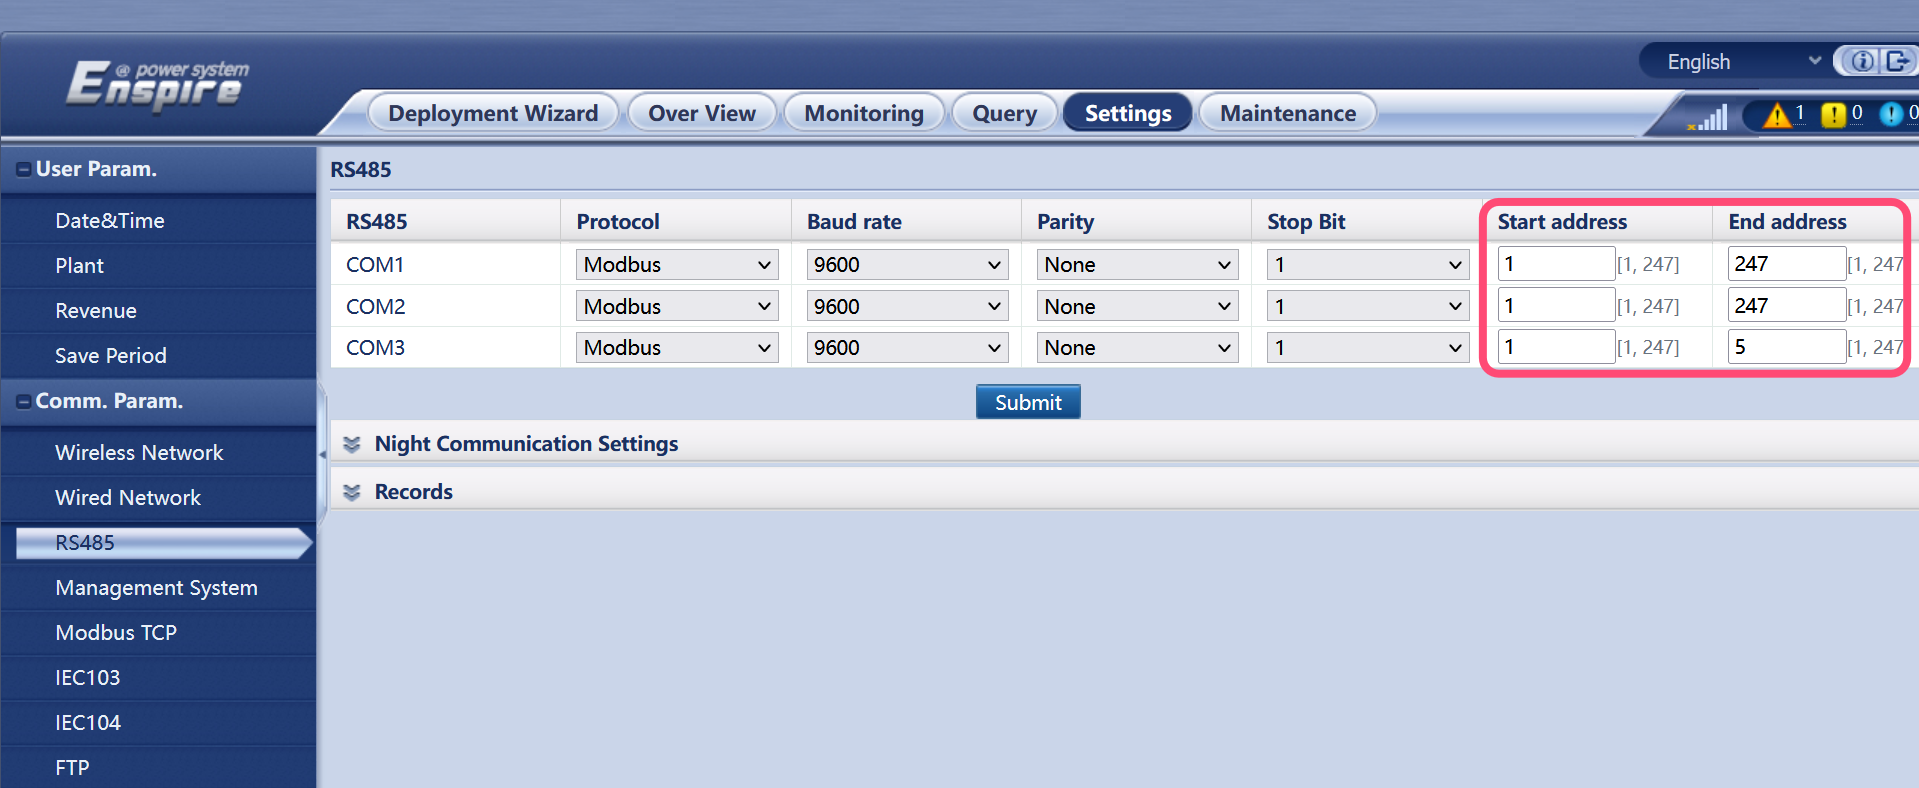
b. Give every device a unique Modbus address
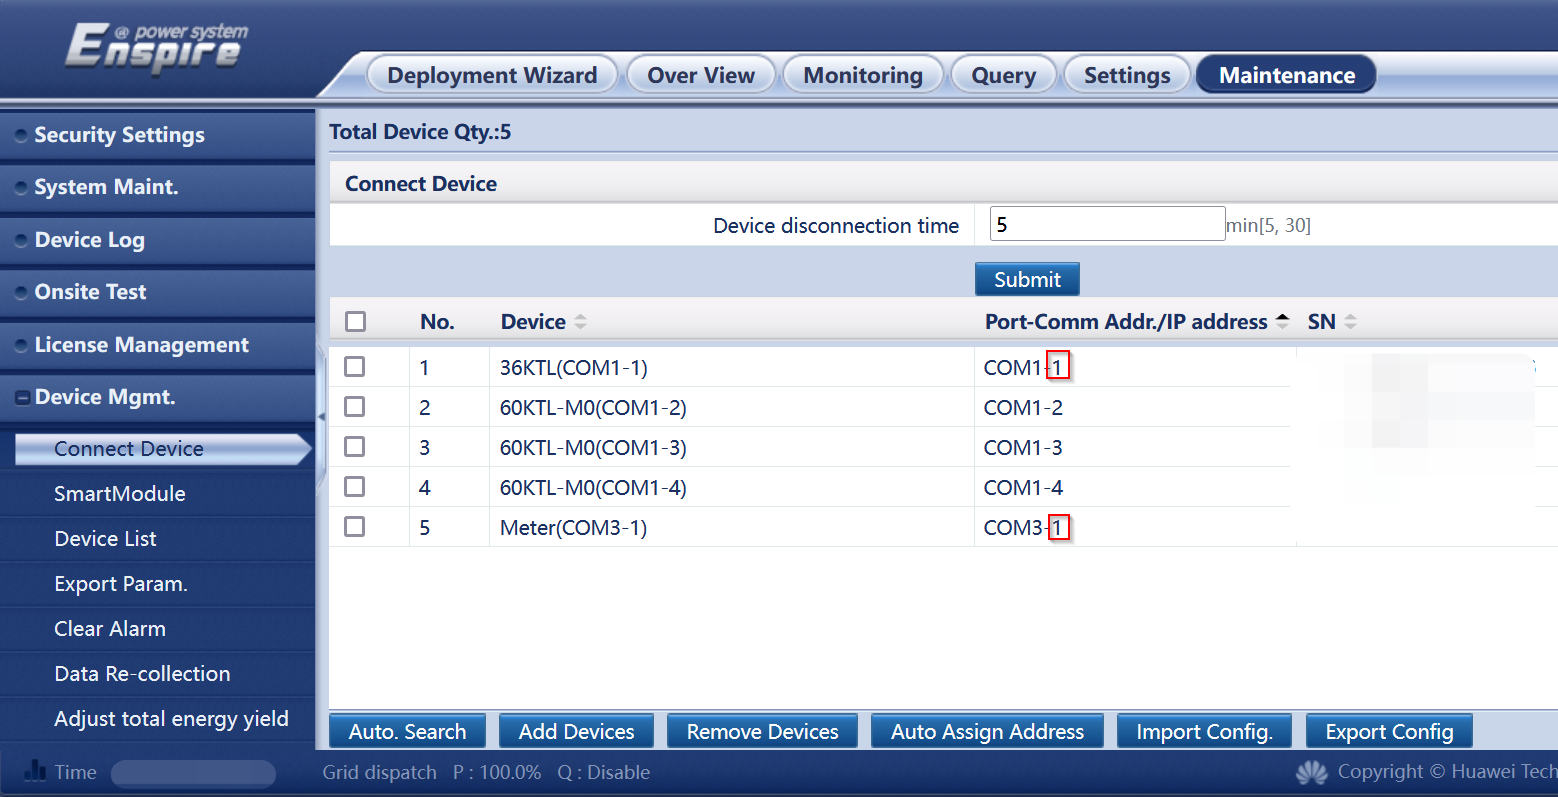
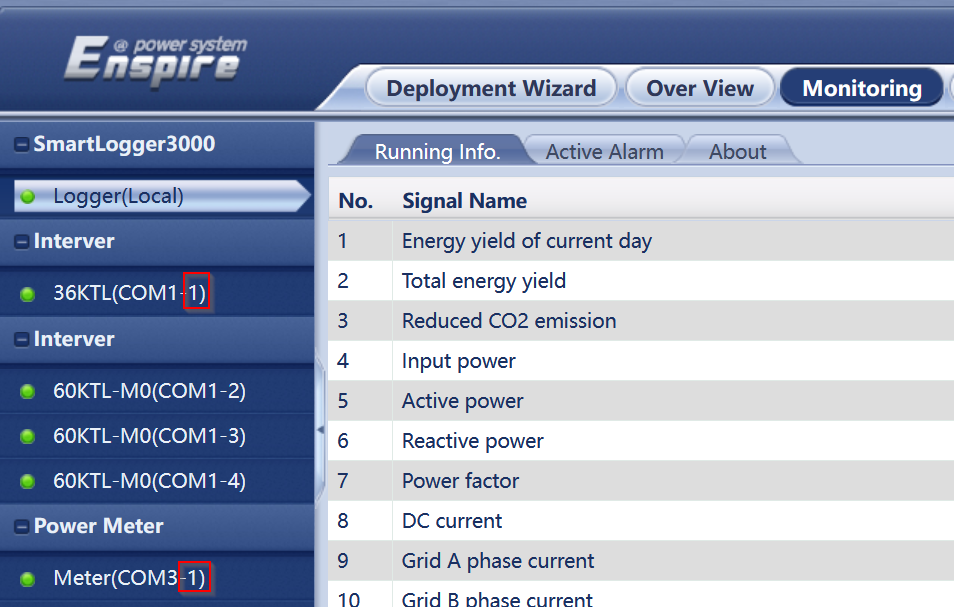
The SmartLogger connects inverters and meters across 3 COM ports. Every Modbus address must be unique. It is easiest to first set non-overlapping address ranges per COM port, then re-add any clashing devices with a free address.
c. Enable remote communication scheduling
This is required for curtailment / power limiting. Without it the controller and SmartLogger report no errors, but the inverters keep producing at full power.
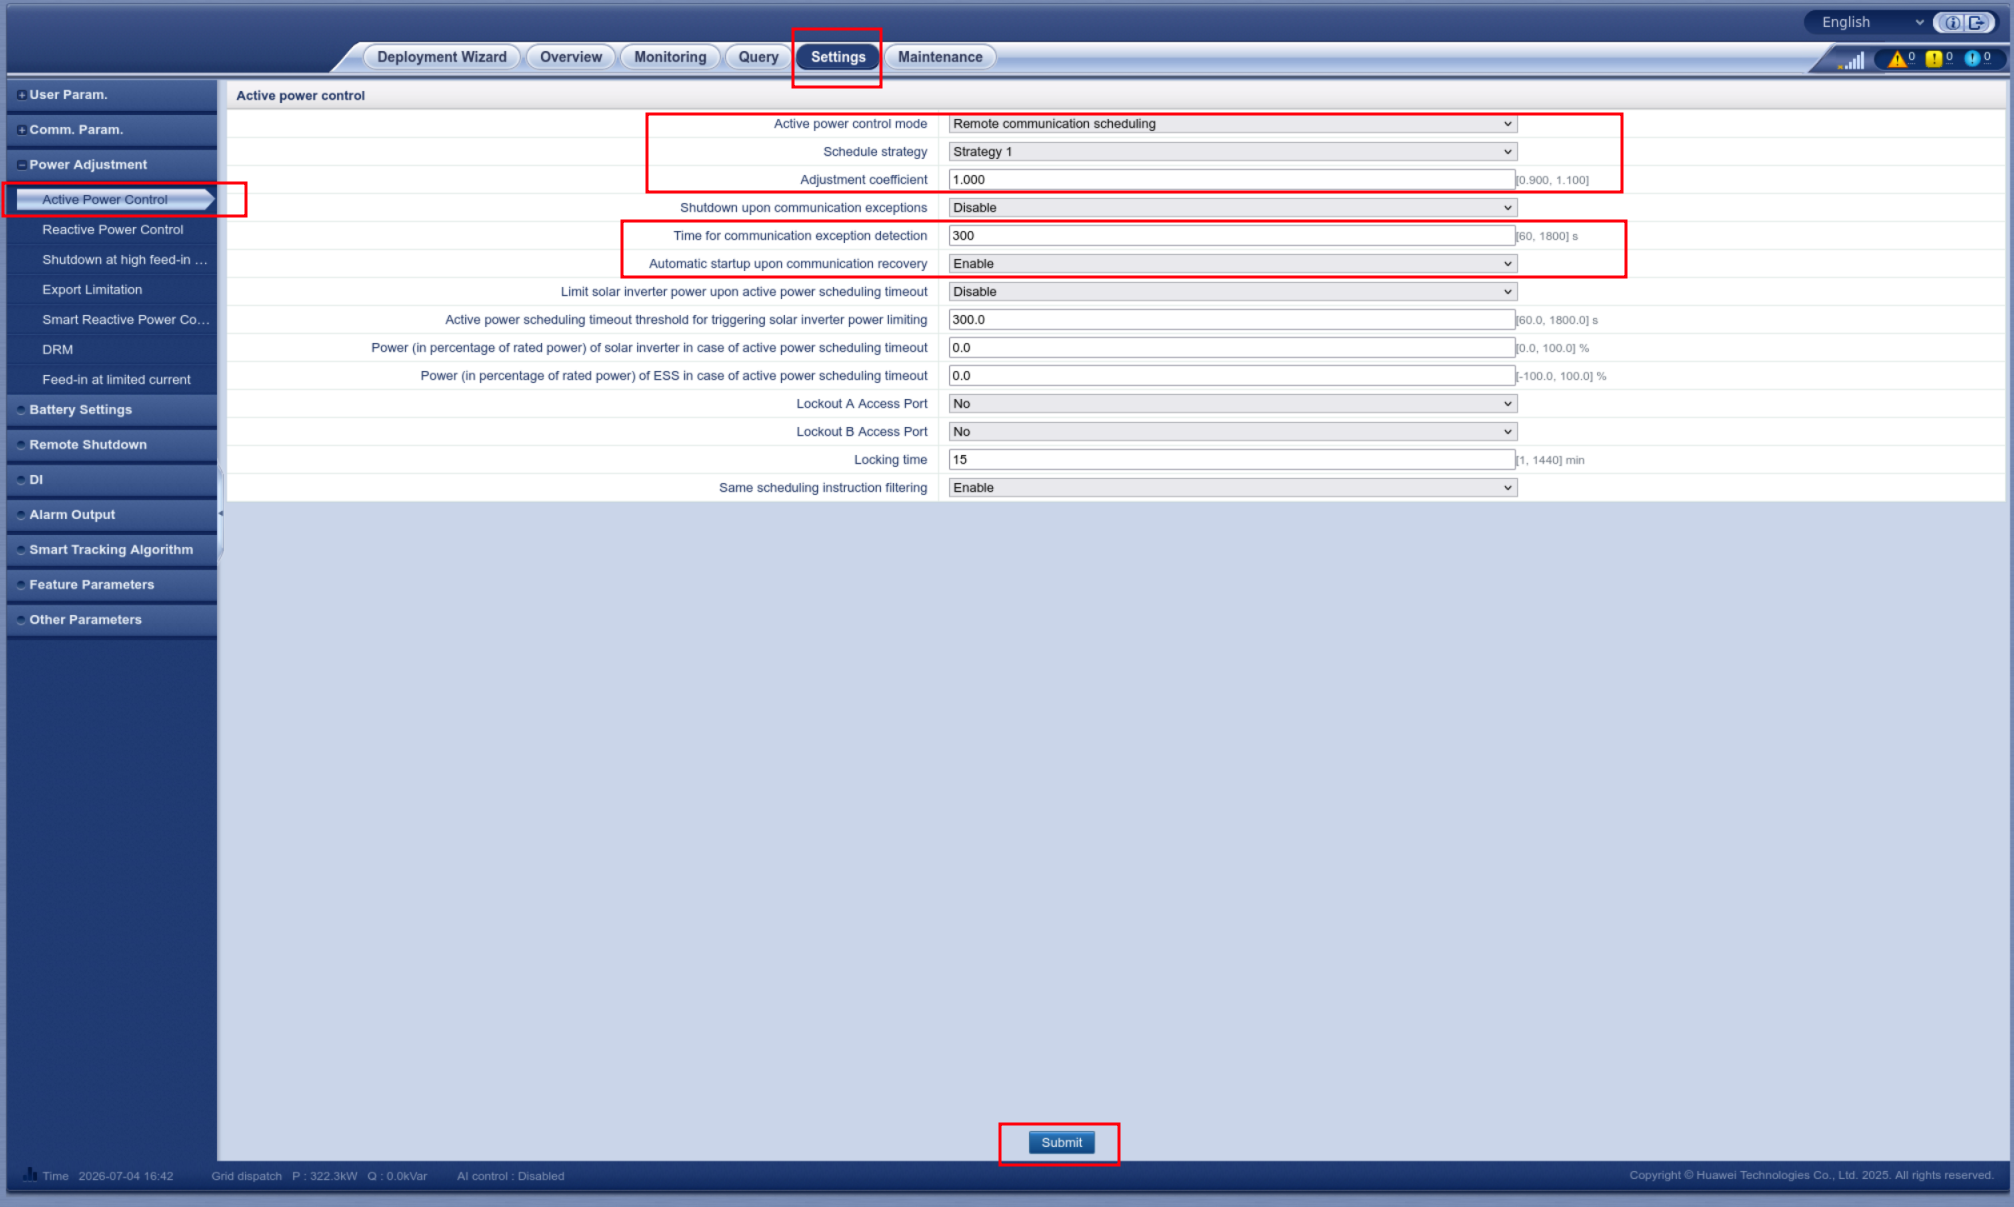
Go to Settings > Power Adjustment > Active Power Control and configure exactly like in the screenshot.
- Active power control mode: Remote communication scheduling
- Schedule strategy: Strategy 1
- Adjustment coefficient: 1.000
- Time for communication exception detection: 300
- Automatic startup upon communication recovery: Enable
d. Enable remote power scheduling on every inverter
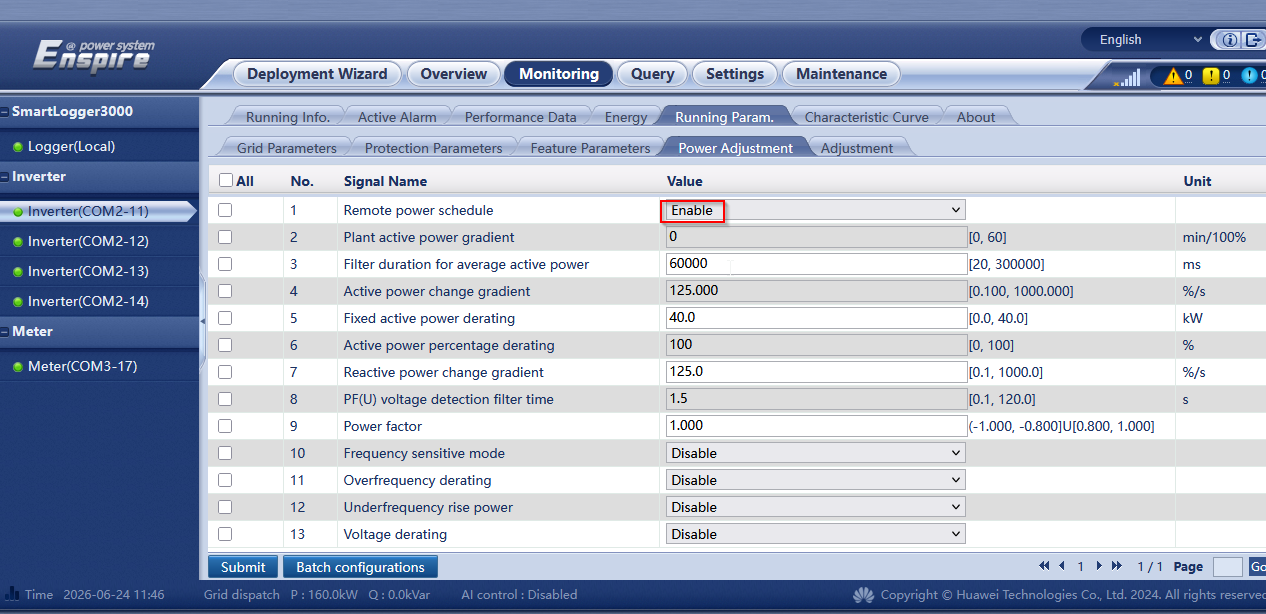
This is required for curtailment / power limiting. Without it the controller and SmartLogger report no errors, but the inverters keep producing at full power. Do this for every inverter:
- Select an inverter in the device tree on the left (e.g.
Inverter(COM2-11)). - Go to Monitoring → Running Param. → Power Adjustment.
- Set Remote power schedule to Enable and click Submit.
- Repeat for every inverter in the tree (
COM2-11,COM2-12, …).
Without a SmartLogger (direct to each inverter)
Configure each inverter from the FusionSolar app.
a. Install the FusionSolar app
| Smartphone OS | Installation instructions |
|---|---|
| iOS | Search the App Store for FusionSolar and download the app. |
| Android | Download the app here. |
| Huawei Phone | Search FusionSolar in the Huawei App Gallery. |
b. Connect to the inverter
Make sure the AC or DC side of the inverter is powered, then connect your phone to it. Pick the method that suits the inverter:
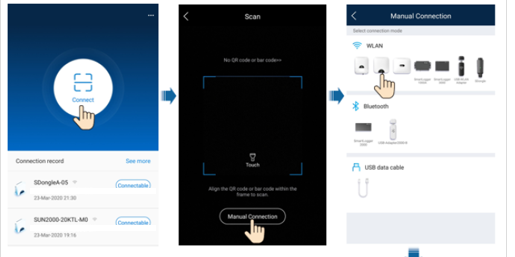
- WLAN — plug the WLAN module into the USB port at the bottom of the inverter, enable WLAN/Bluetooth on your phone, and stay within 5 m.
- Bluetooth — open the app, tap connect, then scan the QR/bar code or select Bluetooth → "Search for Device". With USB Adapter2000-B the device name is "last 8 characters of the serial number + HWAPP".
- USB — connect the inverter's USB port to your phone (the screen shows 'Connected to USB Accessory'), open the app, tap connect, select USB and allow access.
c. Enable Modbus-TCP
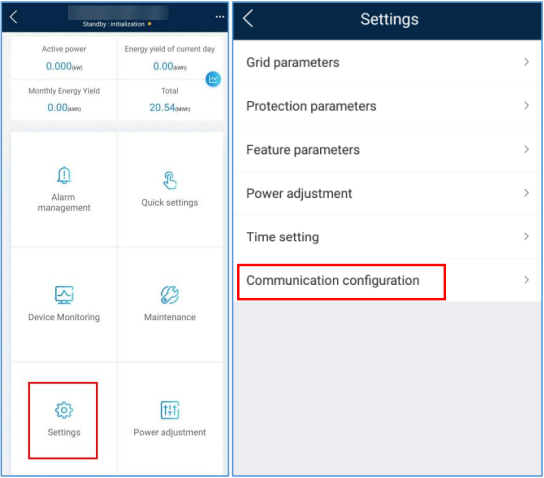
- On the home page, go to Settings → Communication configuration.
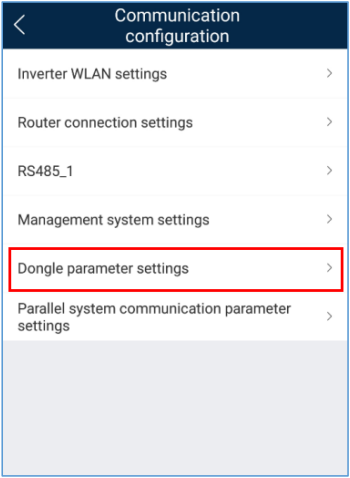
- Open Dongle parameter settings.
- Select Modbus-TCP and set Connection to Enable (unrestricted). If there is no Modbus-TCP option, the inverter must be updated.
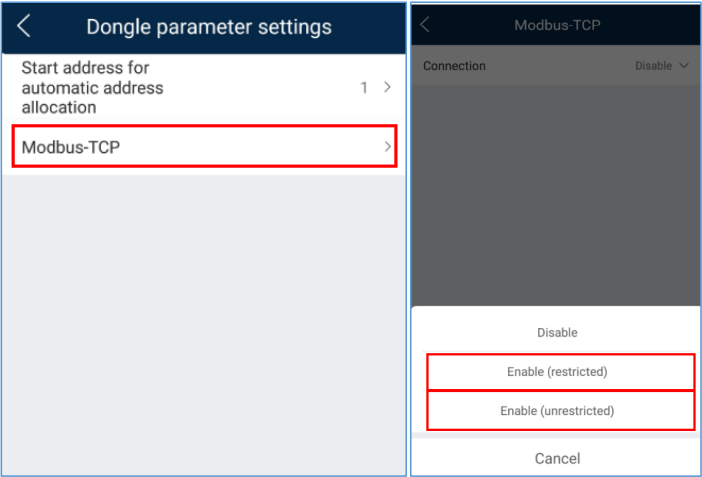
- Still in Dongle parameter settings, change the starting address for automatic address allocation to any other value — the connection only activates once this has changed. (This is not the Modbus address the controller talks to, just a starting value.)
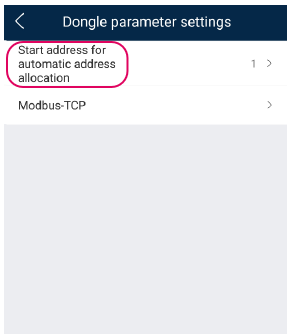
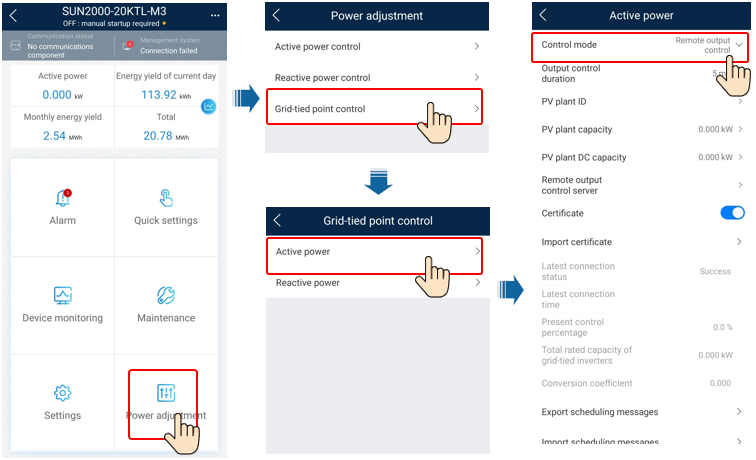
d. Enable remote power control
Required for curtailment: on the home page go to Power adjustment → Grid-tied point control → Active power, and set the Control mode to Remote output control.
LUNA 2000 battery
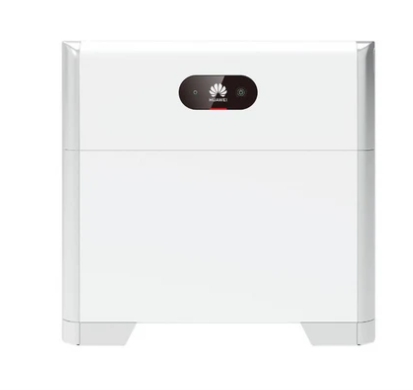
The LUNA 2000 needs no separate connection steps — it is read and controlled through the inverter or SmartLogger it sits behind. Just choose Both solar and battery or Only battery in the wizard (next step) so the controller adds it.
4. Add the system in the controller
Run the search wizard on the correct IP address — the SmartLogger's IP if there is one, otherwise each inverter's IP. During the wizard you choose whether an energy meter is connected (so the controller can read grid data) and what is connected to the inverter (solar, battery, or both). That's it — the controller discovers and adds the rest.
Advanced: curtailing a subset of inverters (bypass mode)
By default, when a SmartLogger is present, all curtailment goes through the SmartLogger's own aggregate registers — the SmartLogger is the only system writing to the inverters, and the controller sends it one fleet-wide power limit. This is the normal, recommended setup, and the reason all control is routed through the SmartLogger in the first place (see step 1).
Some counterparties we integrate with (for example Yuso Solar) require the ability to curtail or shut off a subset of inverters rather than the whole installation. The SmartLogger's aggregate registers cannot do this — they only expose one plant-wide percentage/setpoint, with no way to target or exclude individual inverters. For this specific requirement only, the SmartLogger device has a manual action, "Enable/Disable the smartlogger bypass", that writes curtailment setpoints directly to each inverter's own register instead of through the SmartLogger. Once enabled, every SUN2000 inverter behind the SmartLogger becomes independently controllable — you'll find a separate manual test entry for each inverter instead of one for "PV of all SUN2000s combined".
Waarschuwing
Only enable this if a subset of inverters genuinely needs to be curtailed independently. In every other case, leave it disabled and let the SmartLogger do the controlling.
Enabling bypass mode on the controller is not enough by itself. As long as the SmartLogger's own active power control is still active, it keeps writing its own setpoint to every inverter on its own schedule too — with two systems writing to the same inverter, whichever writes most recently wins, causing brief production spikes. Step b below (setting the SmartLogger's own Active power control mode to "No limit") is what stops the SmartLogger from doing this — both steps are required together, step a alone is not enough.
Do not continue with the steps below unless you can confirm all of the following:
- You understand why bypass mode is needed for this specific installation (a counterparty requires curtailing/shutting off a subset of inverters — this is not a general-purpose curtailment mode, and enabling it "just in case" or to work around an unrelated issue is wrong).
- You will complete both steps below (a and b) — enabling bypass without also setting the SmartLogger to "No limit" causes the production spikes described above.
- You have explained this to the customer/installer responsible for the site.
If you cannot confirm all three, stop here and use the SmartLogger's normal aggregate control instead.
a. Enable bypass mode on the controller
- On the SmartLogger's device row, click Other actions.

- Select "Enable/Disable the smartlogger bypass" and click Execute action.
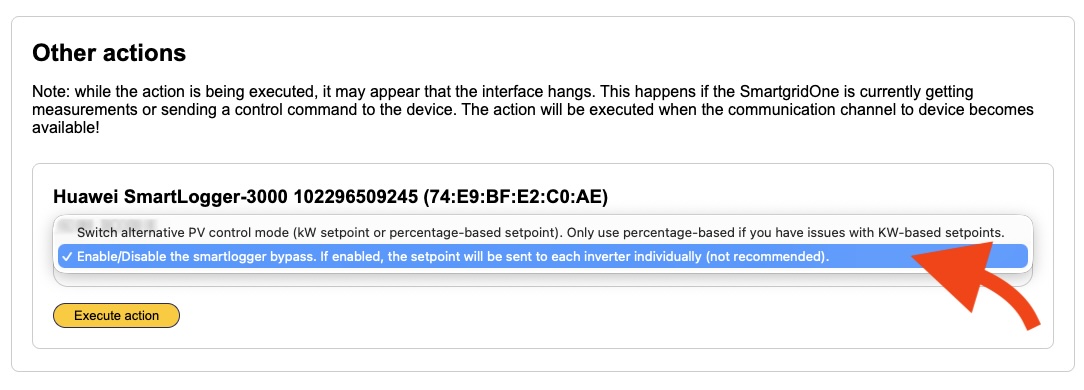
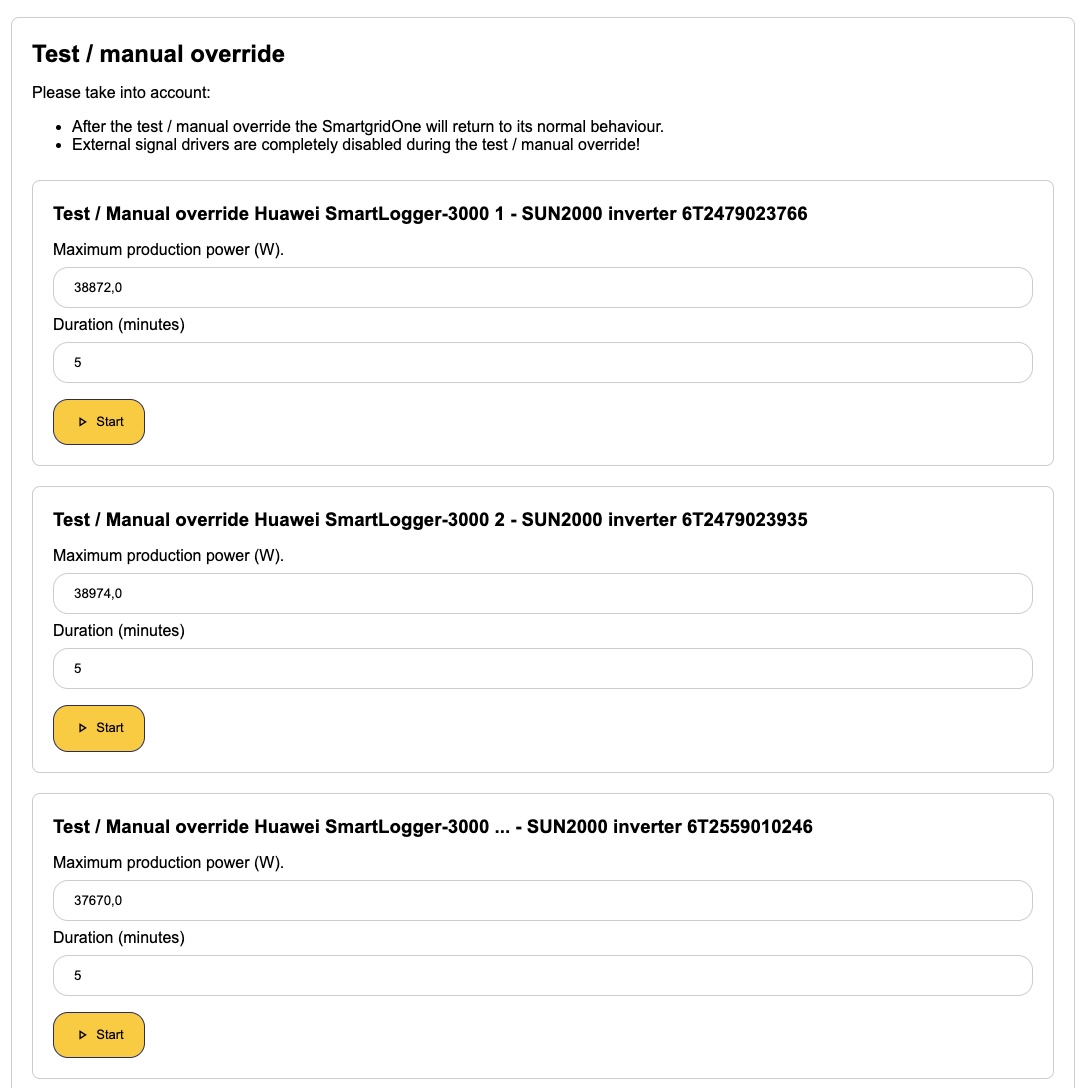
- Confirm it worked: open Test / manual override for the SmartLogger. You should now see one entry per SUN2000 inverter (each with its own maximum production power field), instead of a single "PV of all SUN2000s combined" entry.
b. Set the SmartLogger's own active power control to "No limit"
This step is required, not optional — see the warning above. It stops the SmartLogger from also writing its own setpoint to the inverters, which is what causes the production spikes when only step a has been done.
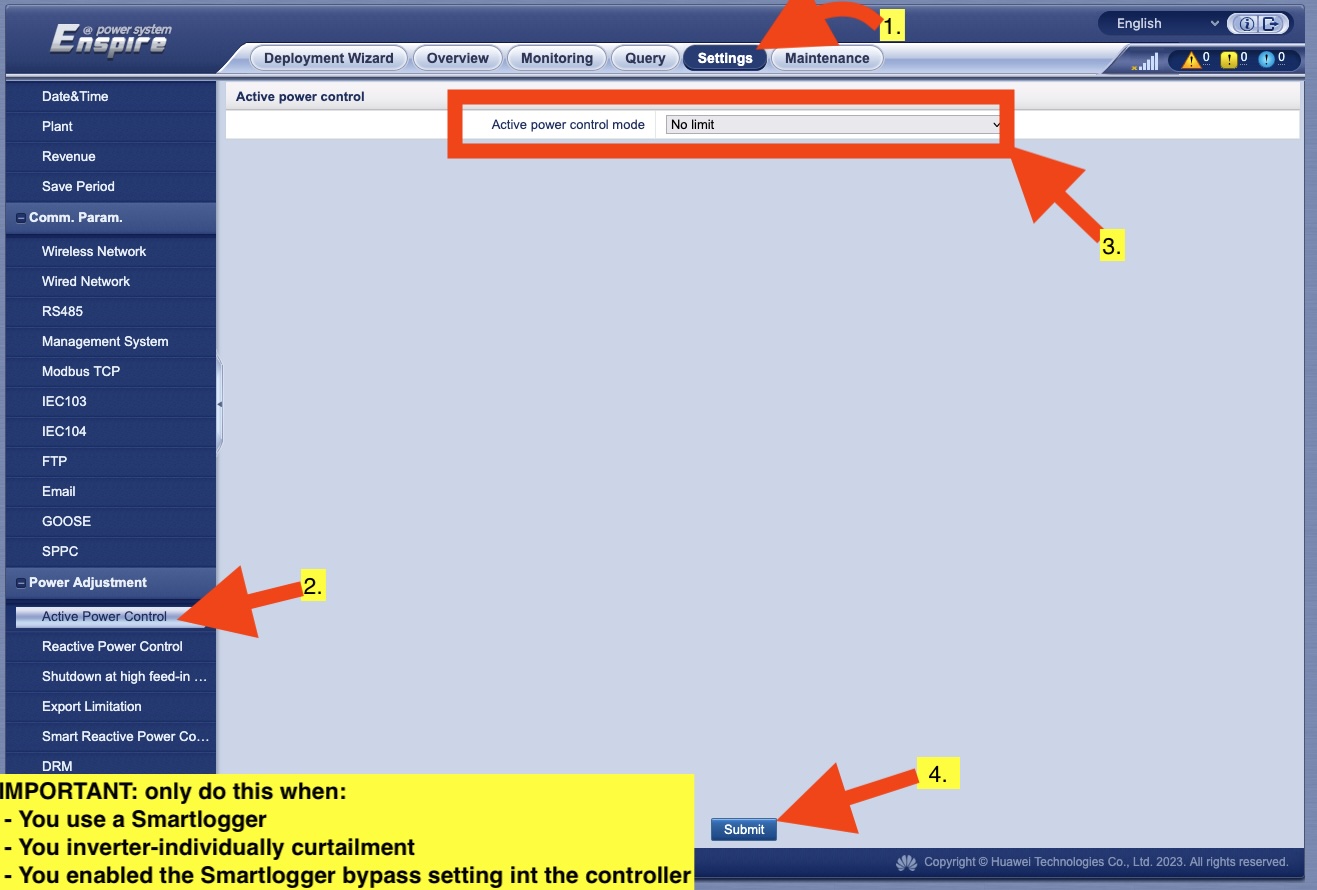
In the SmartLogger's own web interface (Settings → Power Adjustment → Active Power Control), set Active power control mode to No limit and submit.
Belangrijk
Only change this SmartLogger setting when all of the following are true: you use a SmartLogger, you need inverter-individual curtailment, and you have already enabled the smartlogger bypass setting in the controller (step a above). Changing it in any other situation disables curtailment for this SmartLogger entirely.
Troubleshooting
Curtailment / power limiting has no effect. The inverters are almost certainly missing the remote-scheduling setting. Re-check that Remote power schedule is enabled on every inverter (SmartLogger setup, step 3c) — the controller will report no error even when this is the cause.
Devices won't connect, values can't be read, or the SmartLogger reports 0 power. First, update firmware. In FusionSolar, check for and install updates for both the Huawei software (SmartLogger / dongle) and each inverter, keeping them on matching versions — outdated or mismatched firmware is a common cause of missing registers, unreadable values and ignored commands. If the SmartLogger still reports 0 power after enabling Modbus, contact Huawei.