The mentioned functionalities may be restricted depending on the purchased software license.
Getting Started with Public displays
SmartgridX's public displays tool is designed to generate fully customizable visualizations for installations. Whether you need internal analysis dashboards or quick and accessible visual displays, public displays offer flexible, customizable, and user-friendly configuration options.
This guide provides a quick start overview of public displays, covering the main components and their effective usage. Detailed information for each component is available on their respective documentation pages.
⚠️ This feature is currently in active development - new features and options will be continuously added. For suggestions or feature requests, please contact our support team.
Overview
The public display system empowers users to create custom visualizations for their installations with complete control over the display layout and content.
Workflow Summary
To set up public displays in SmartgridX, follow this three-step process:
- 🎛️ Claim your controller - Register the public display controller to your account
- 📐 Create a template - Design the visual layout for your installation
- ⚙️ Configure the public display - Configure the template for your installation and link it to the controller
💡 Pro Tip: You can create and test templates without physical hardware - simply skip step 1 to preview your designs before deployment.
Step-by-Step Setup
1. Public display Controller
📖 For detailed controller information, visit the Public display Controller documentation page.
This section covers claiming and managing your public display controller hardware.
🚀 Quick Start Option: Want to explore public displays without hardware? Skip to Step 2: Template Creation to design and preview templates. You can always claim a controller later!
⚠️ Note: Without a claimed controller, you can still create and configure templates to preview the final result, but the public display won't display on physical hardware.
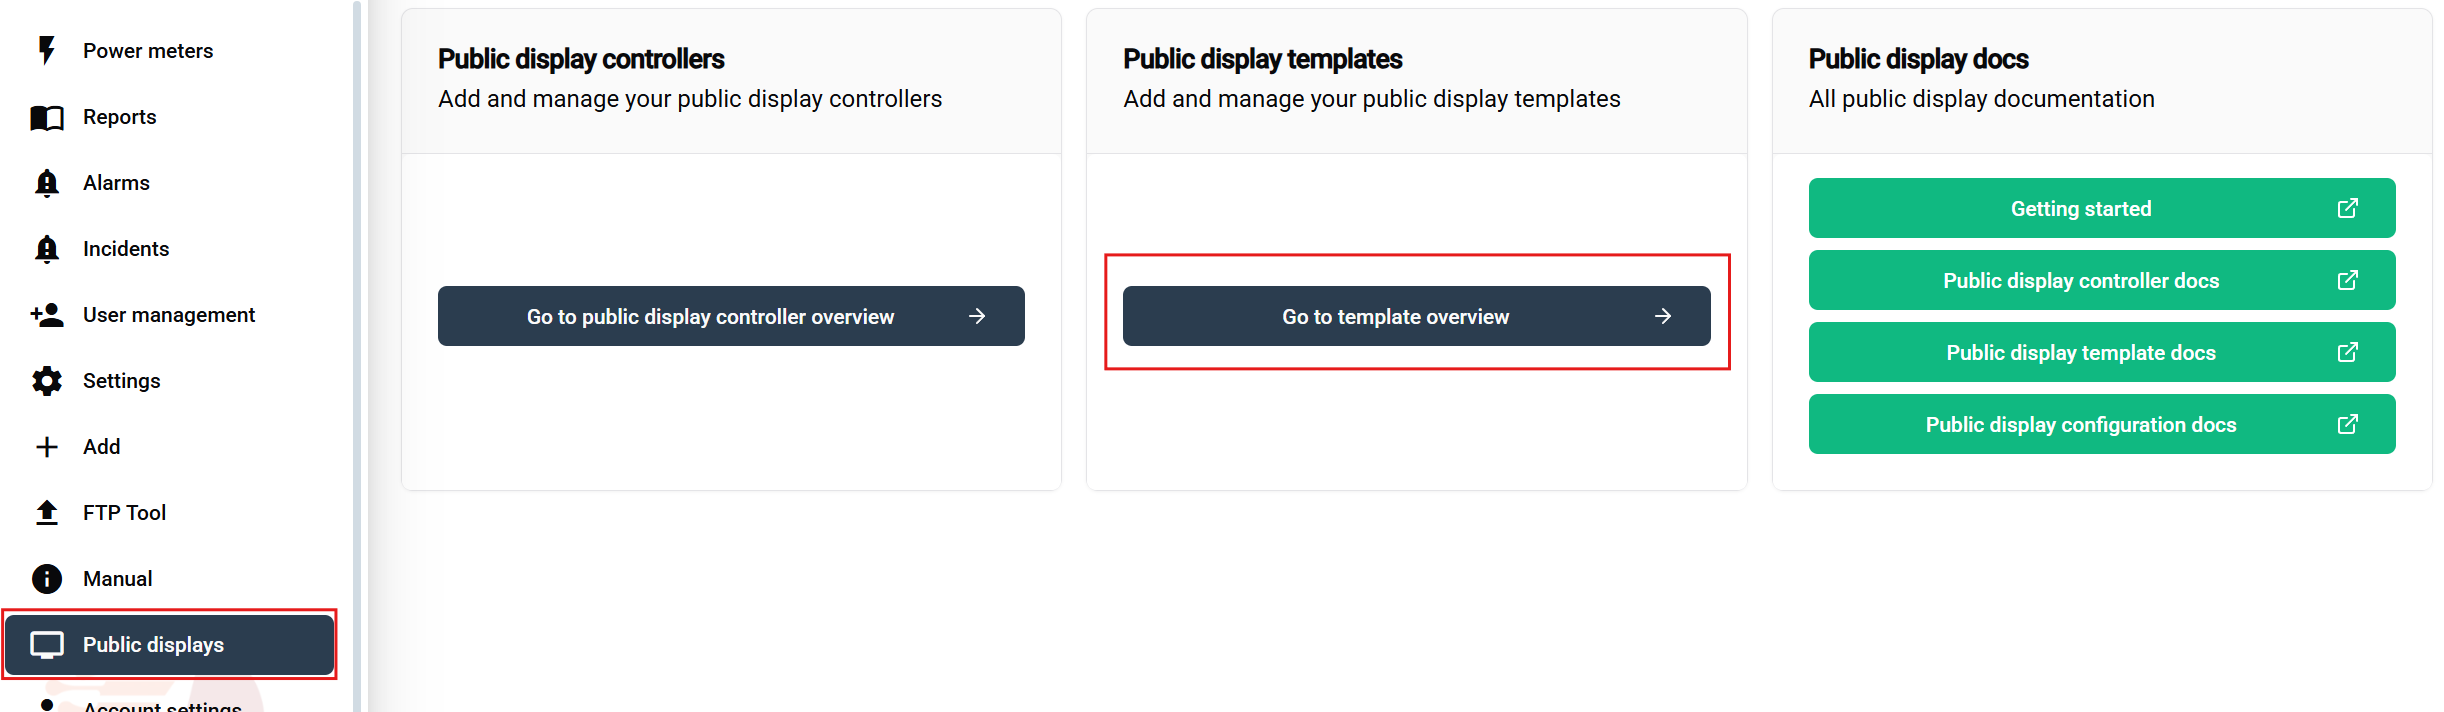
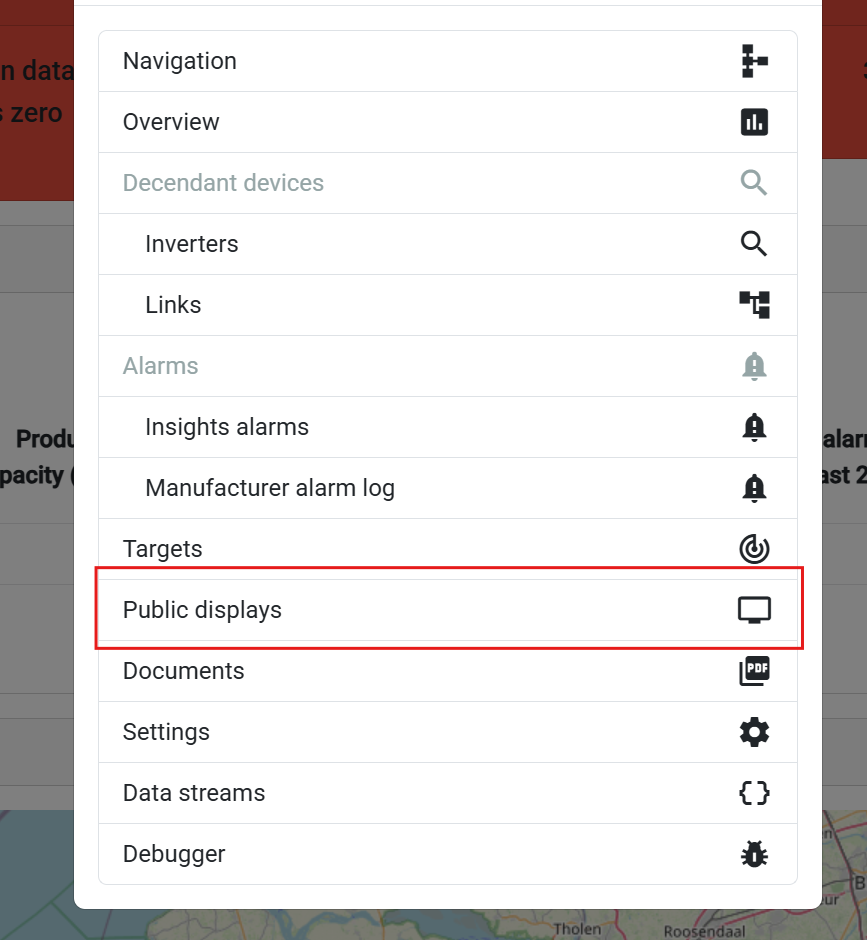
Navigation to Controller Management
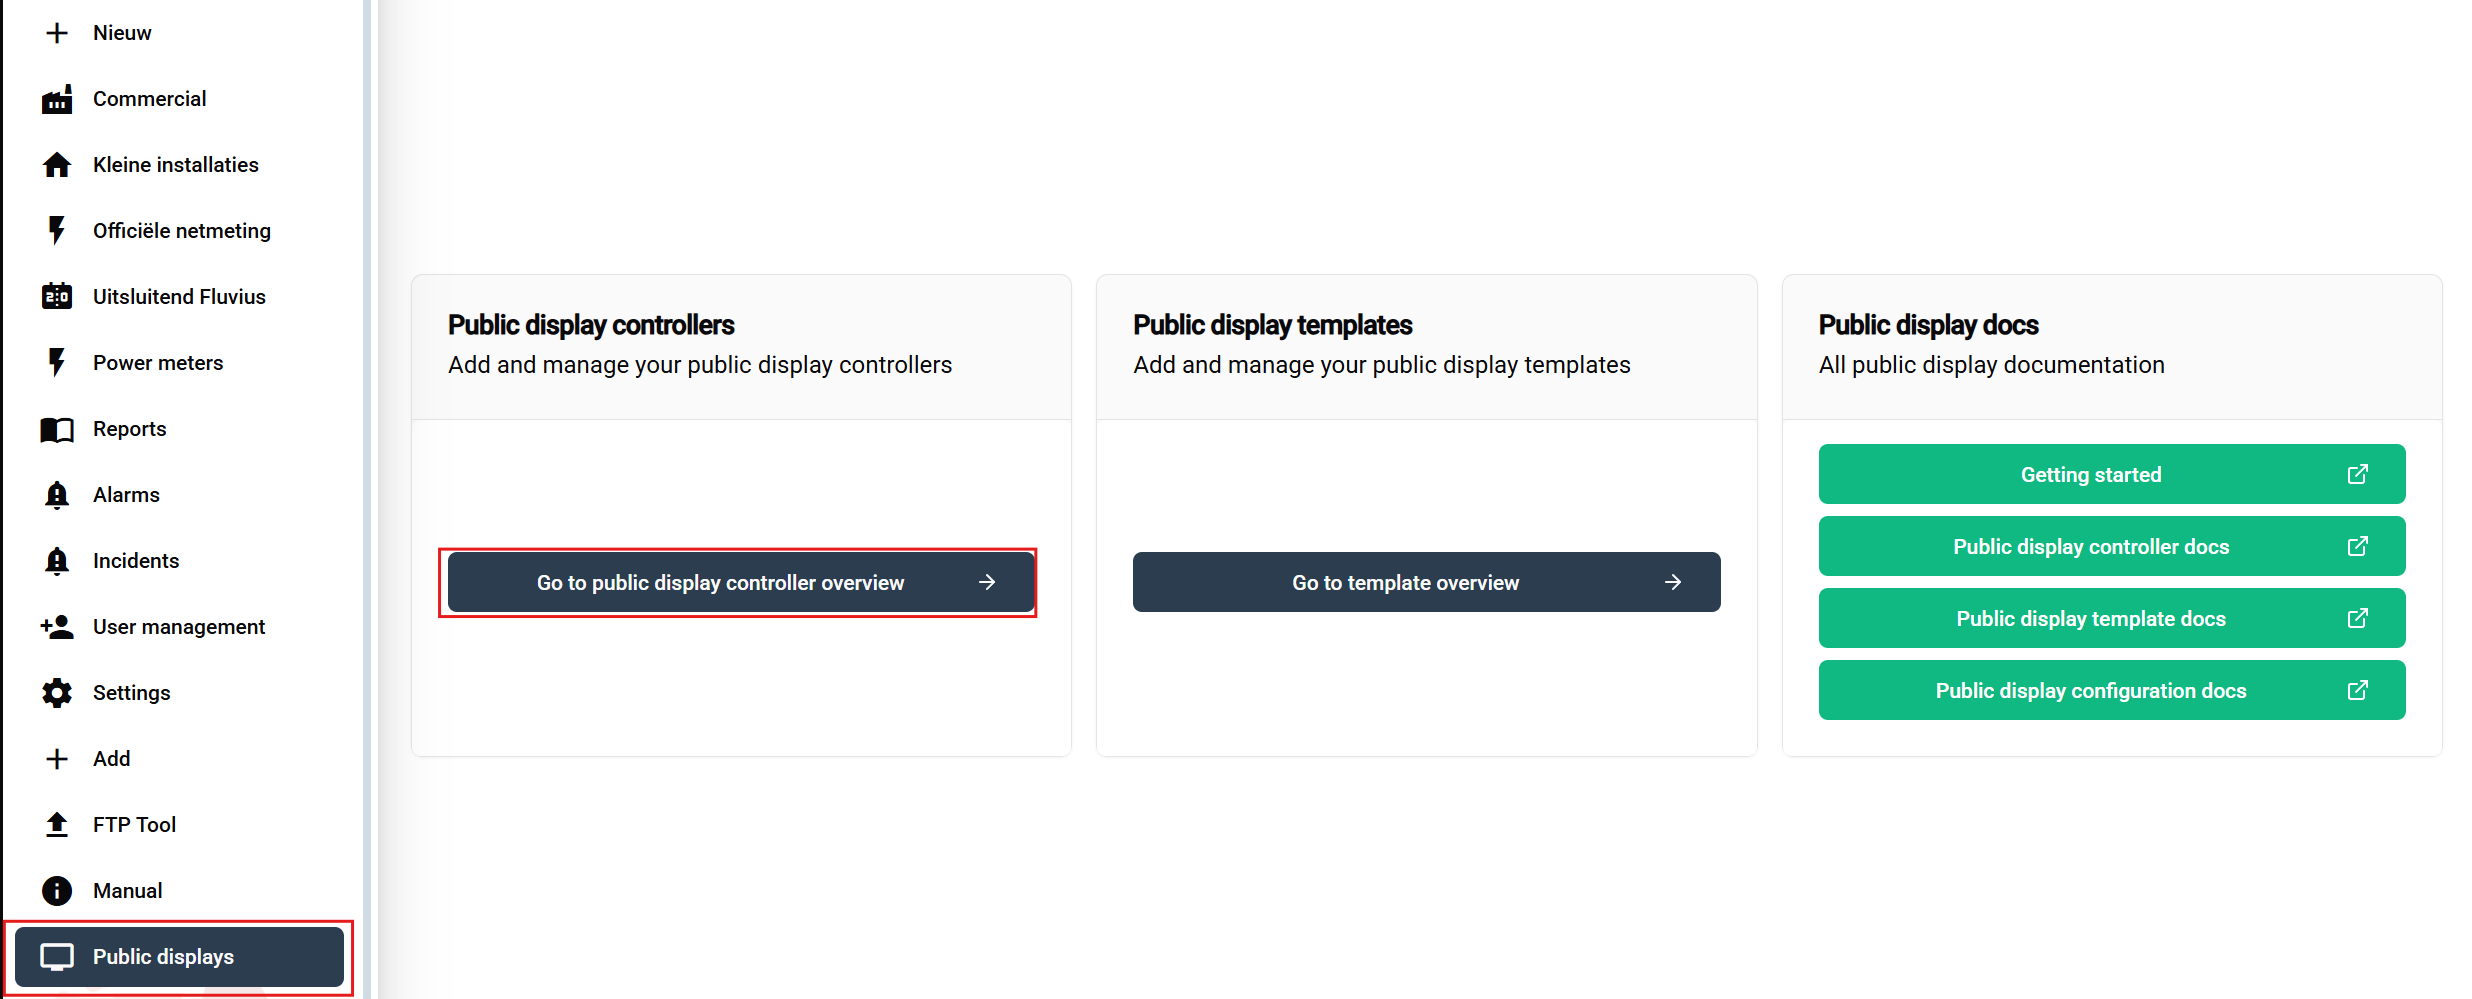
- Navigate to Public displays: Click the 'Public displays' section in the sidebar
- Access Controller Section: On the overview page, locate and click the Public display Controller button (highlighted in the screenshot above)
Controller Overview Table
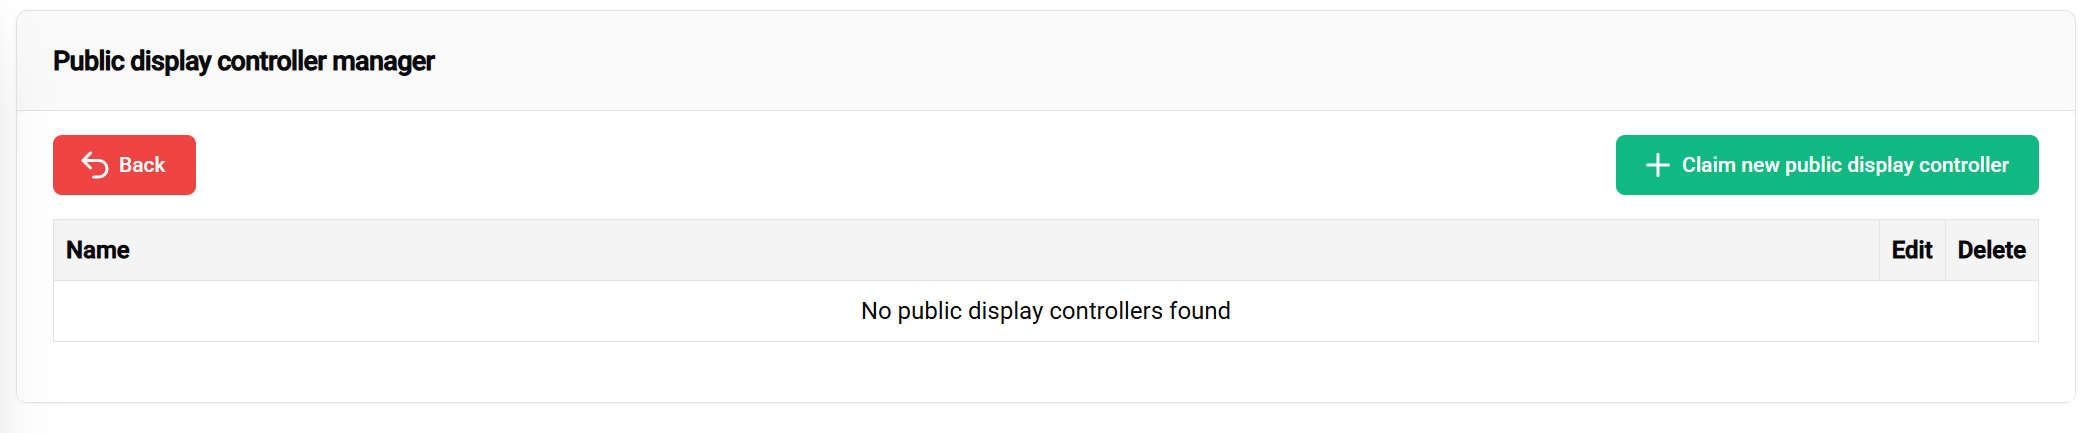
The controller table displays:
- 📋 Overview of all your registered controllers
- ➕ Claim new controllers button (top-right corner)
- ✏️ Management options for existing controllers
Claiming Your Controller
Steps to claim:
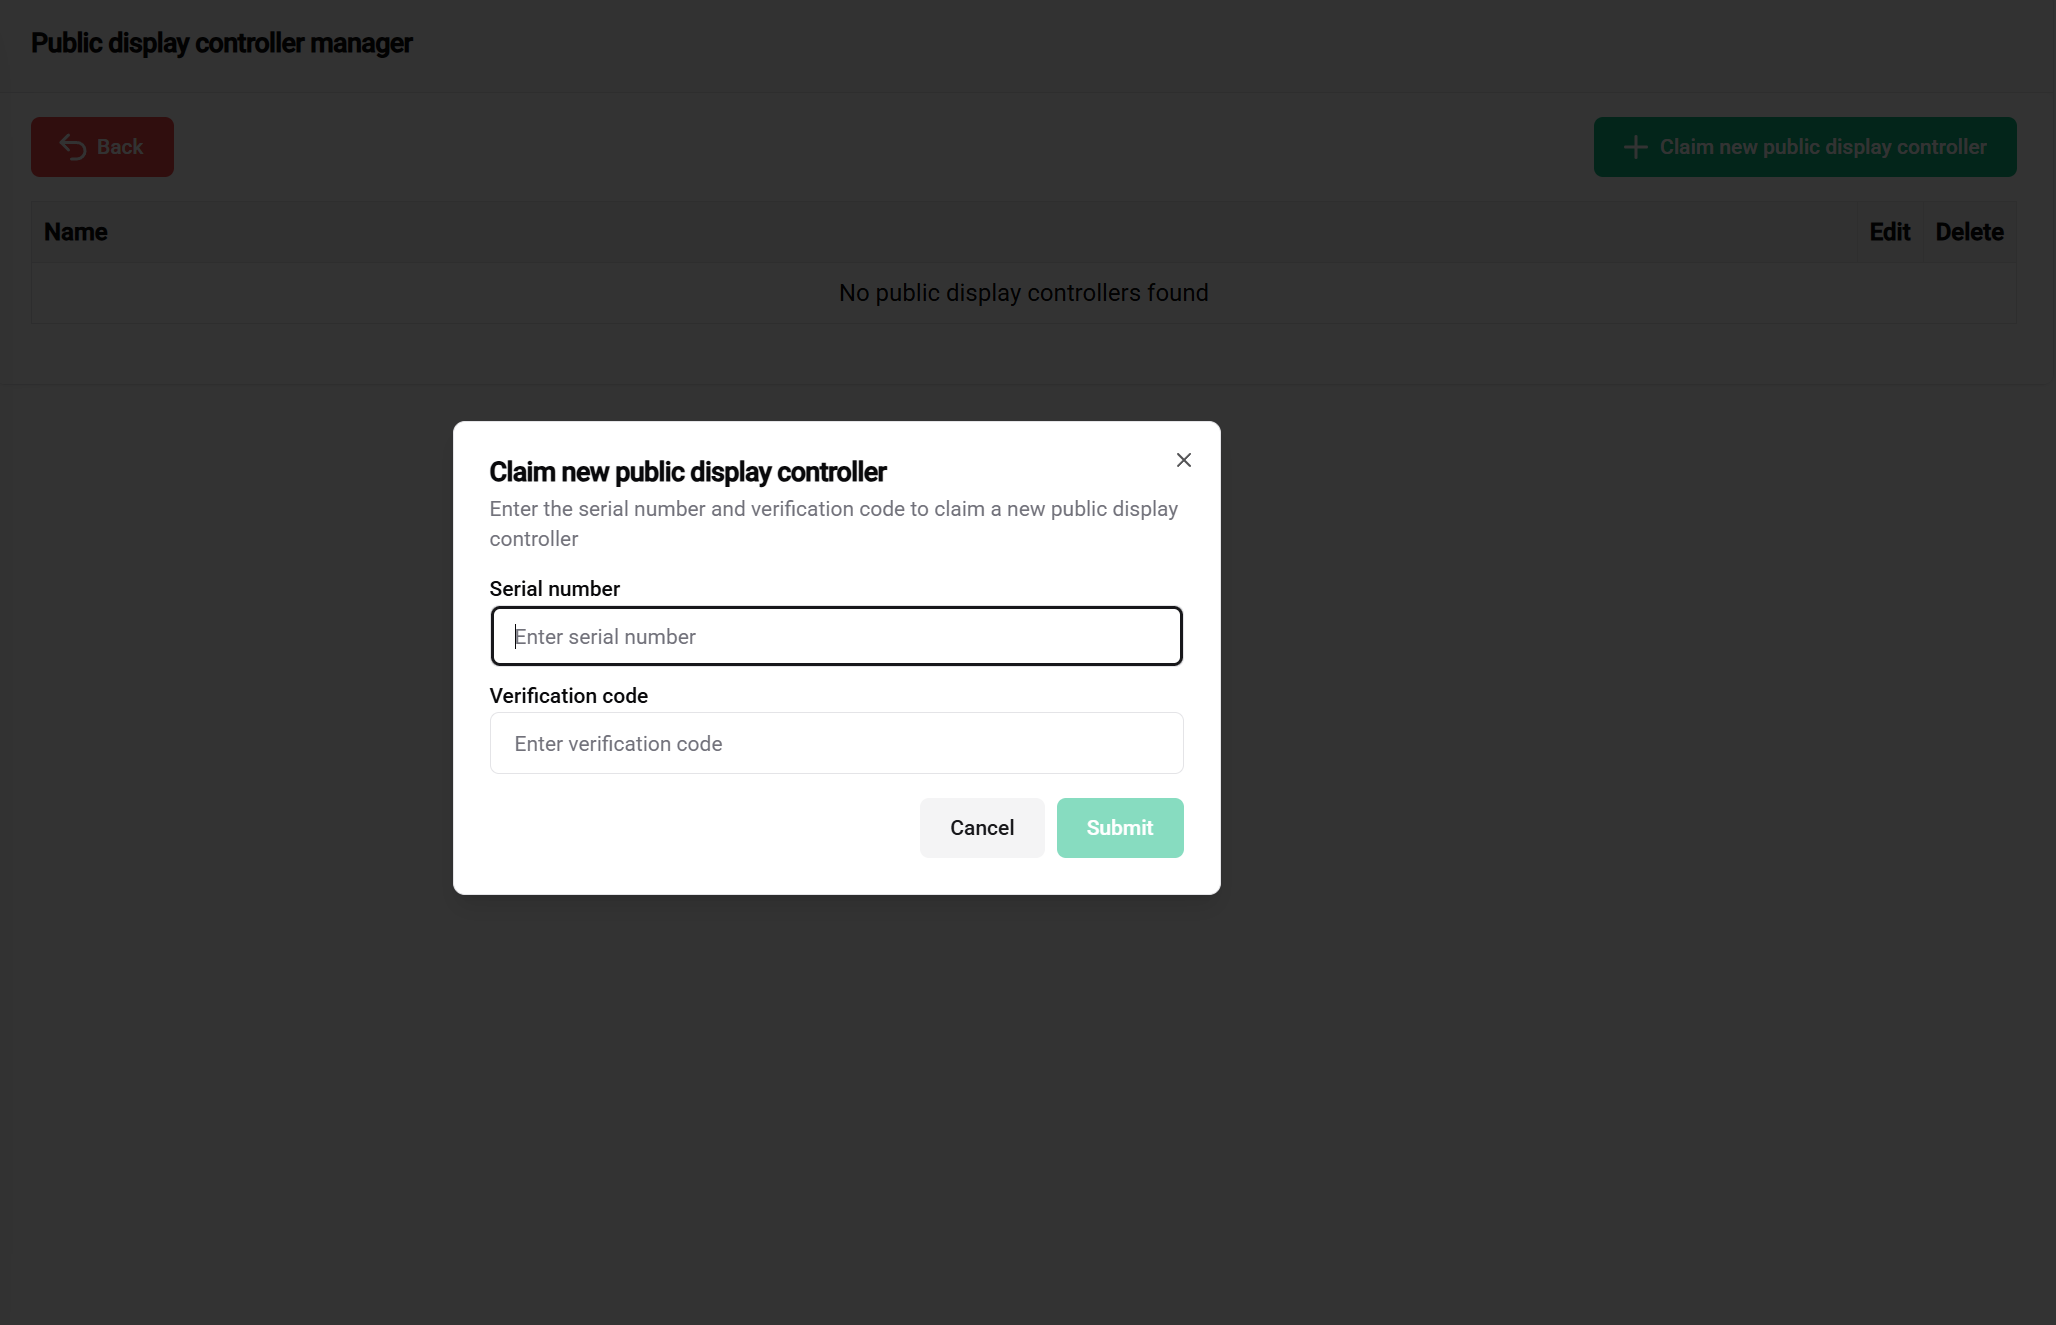
- Click the green "Claim Controller" button
- Enter the serial number (found on controller sticker)
- Enter the verification code (found on controller sticker)
🔐 Save your controller credentials safely! Store the serial number and verification code in a secure file (Excel, text file, etc.). Our support team cannot provide verification codes for security reasons.
Successfully Claimed Controller
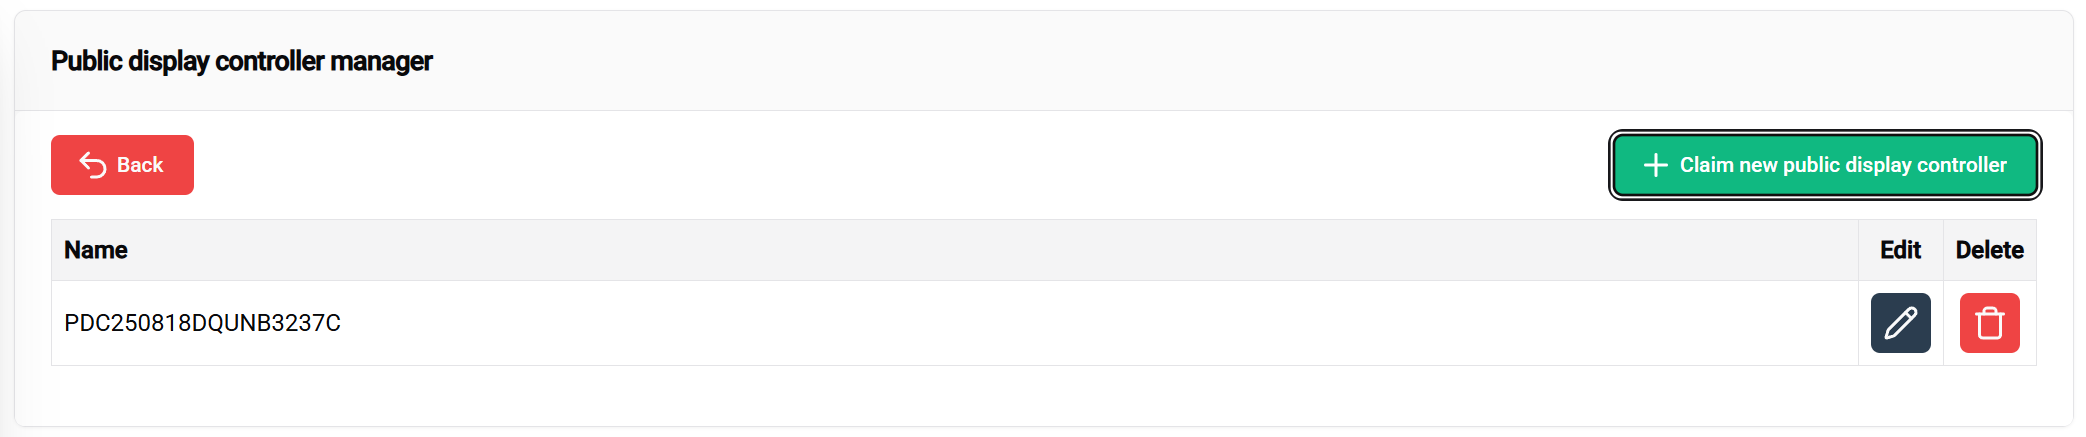
✅ Success! Your controller now appears in the table with options to:
- 📝 Edit the controller name
- 🔓 Unclaim if needed
2. Public display Template
📖 For comprehensive template creation guidance, visit the Public display Template documentation page.
In this step, you'll design the visual layout for your installation. Templates serve as reusable blueprints that define how your public display will be structured and displayed.
📝 Getting Started Note: This section provides essential template creation steps. For advanced customization options and detailed configuration, refer to the full template documentation.
Accessing Template Manager
Navigation steps:
- Go to 'Public displays' in the sidebar
- Click the 'Public display Template' button on the overview page
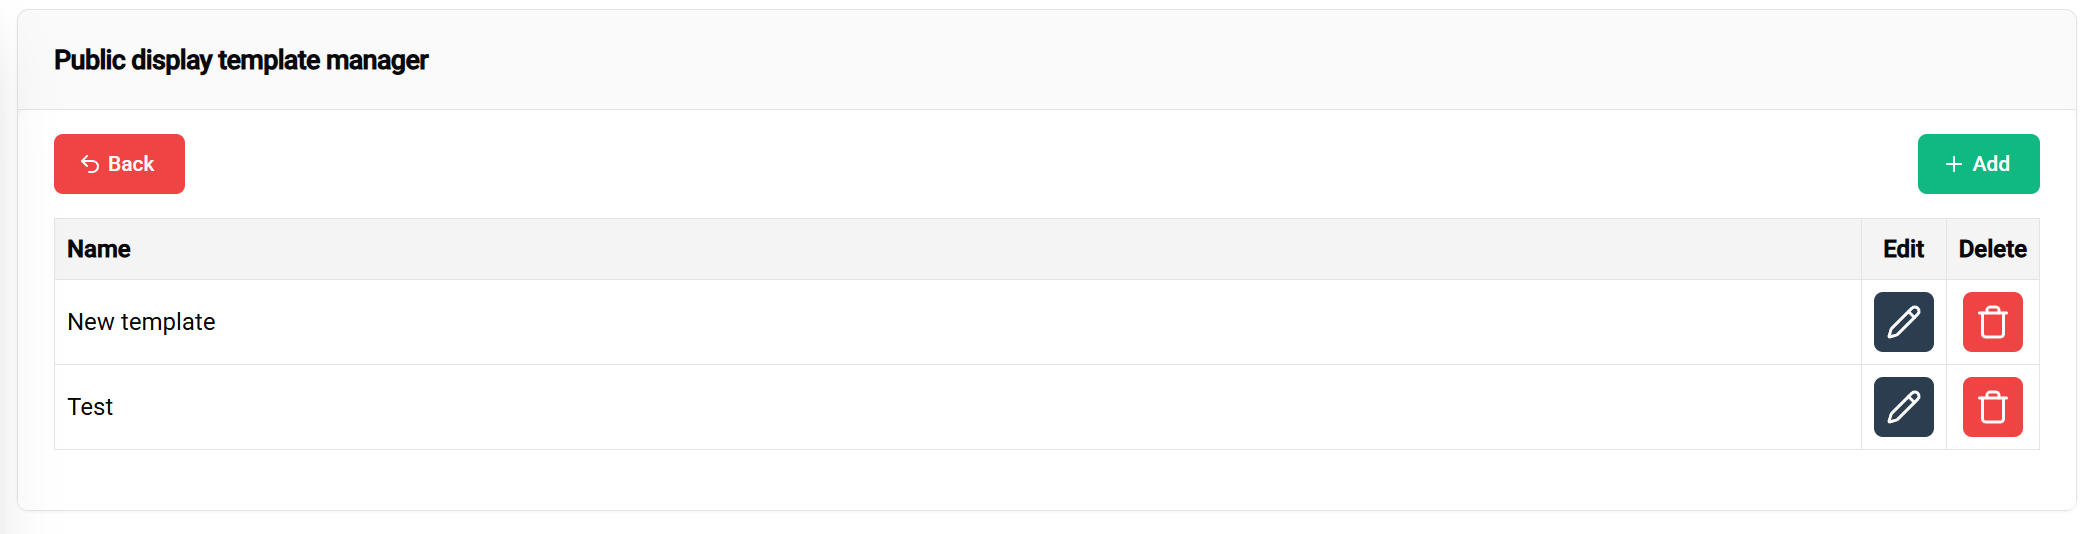
Template Management Interface
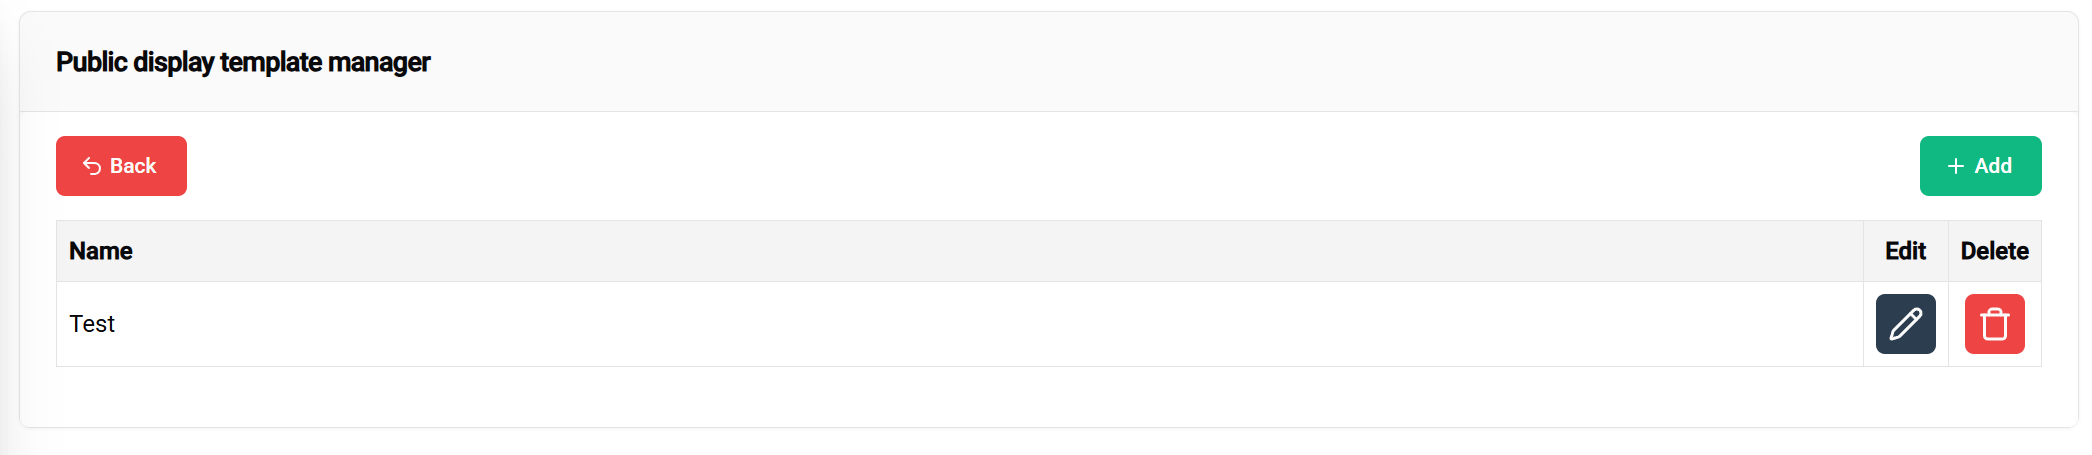
The template table provides:
- 📋 Overview of all your templates
- ➕ Add new templates
- ✏️ Edit existing templates
- 🗑️ Delete templates
Template Header Configuration
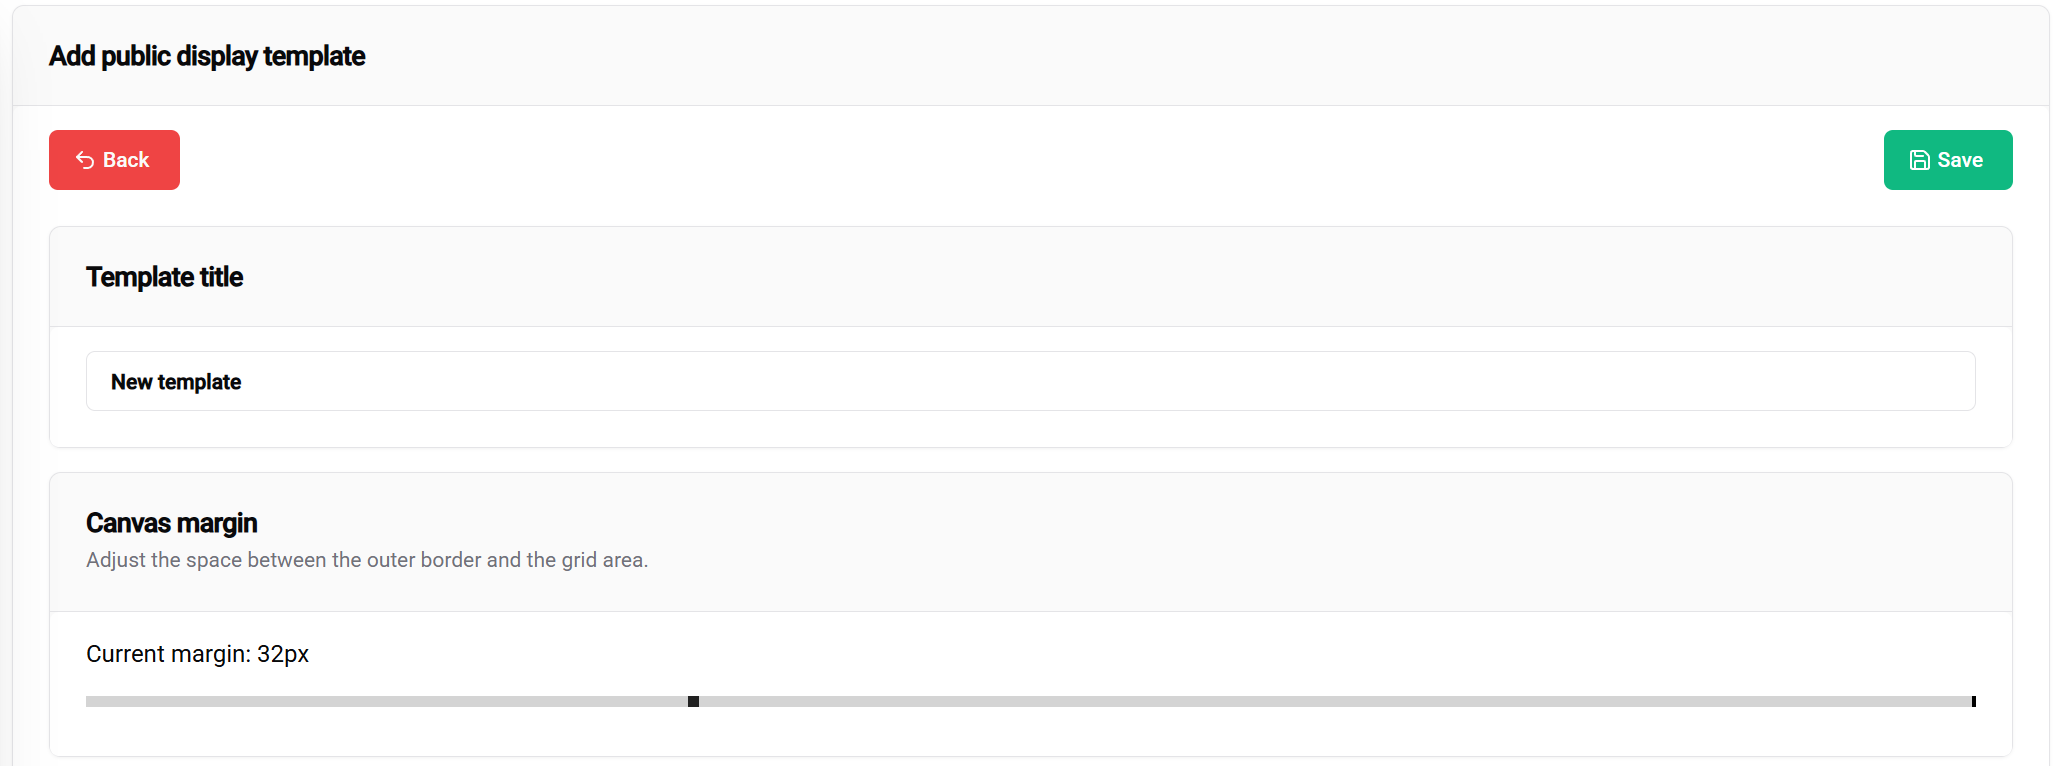
Header settings include:
- 📝 Template title - Name your public display display
- 📐 Margin settings - Define spacing around content
- 💾 Save button - Located in the top-right corner
Block Layout System
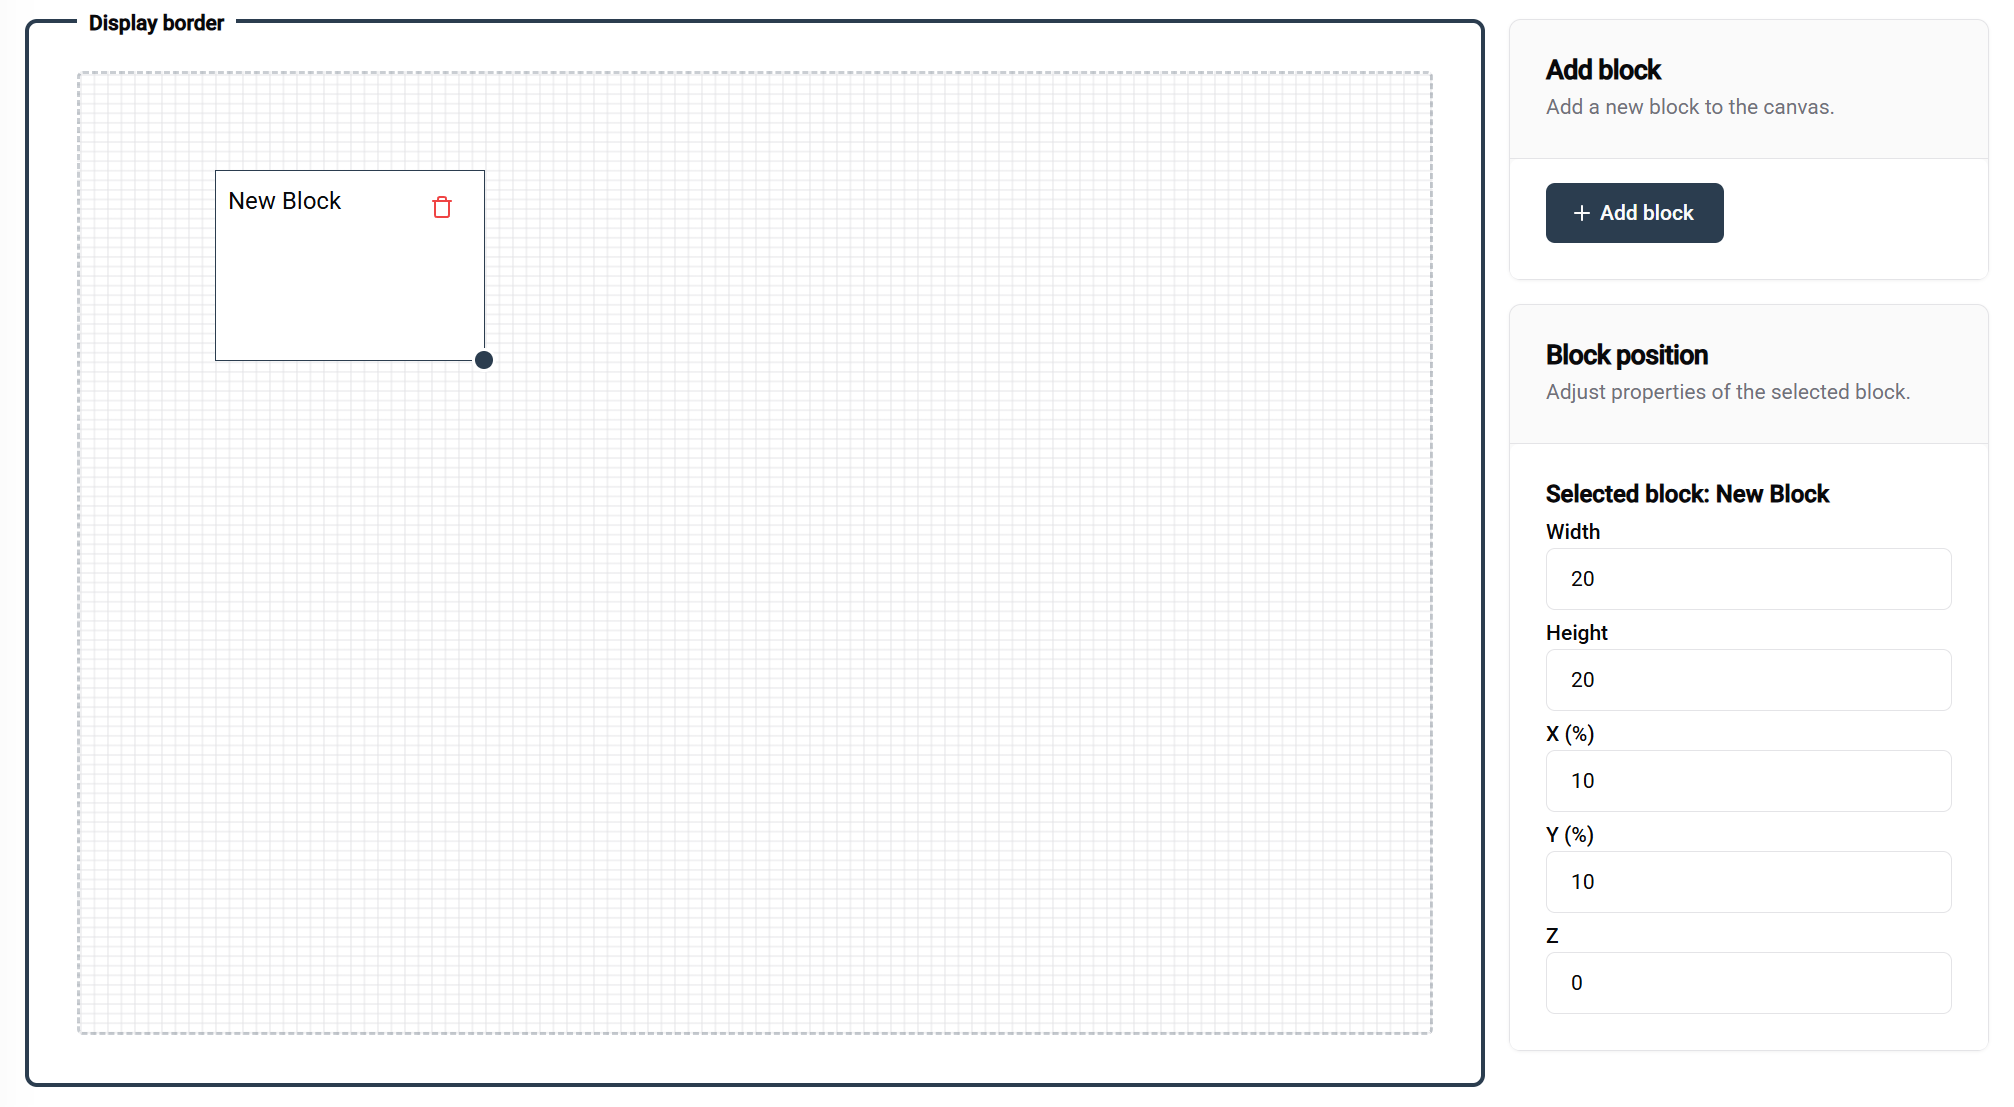
Working with blocks:
- ➕ Add blocks using the top-right corner button
- 🎯 Position blocks via drag and drop
- 📏 Resize blocks by dragging the bottom-right corner handle
📐 Grid System Details:
- Grid size: 100×100 (percentage-based)
- Example layouts:
- Two blocks at 50% width × 100% height = side-by-side layout
- One block at 100% width × 100% height = full coverage
🎛️ Precision Controls:
- Use the right-side panel for exact positioning values
- Perfect for fine-tuning block placement
Block Configuration
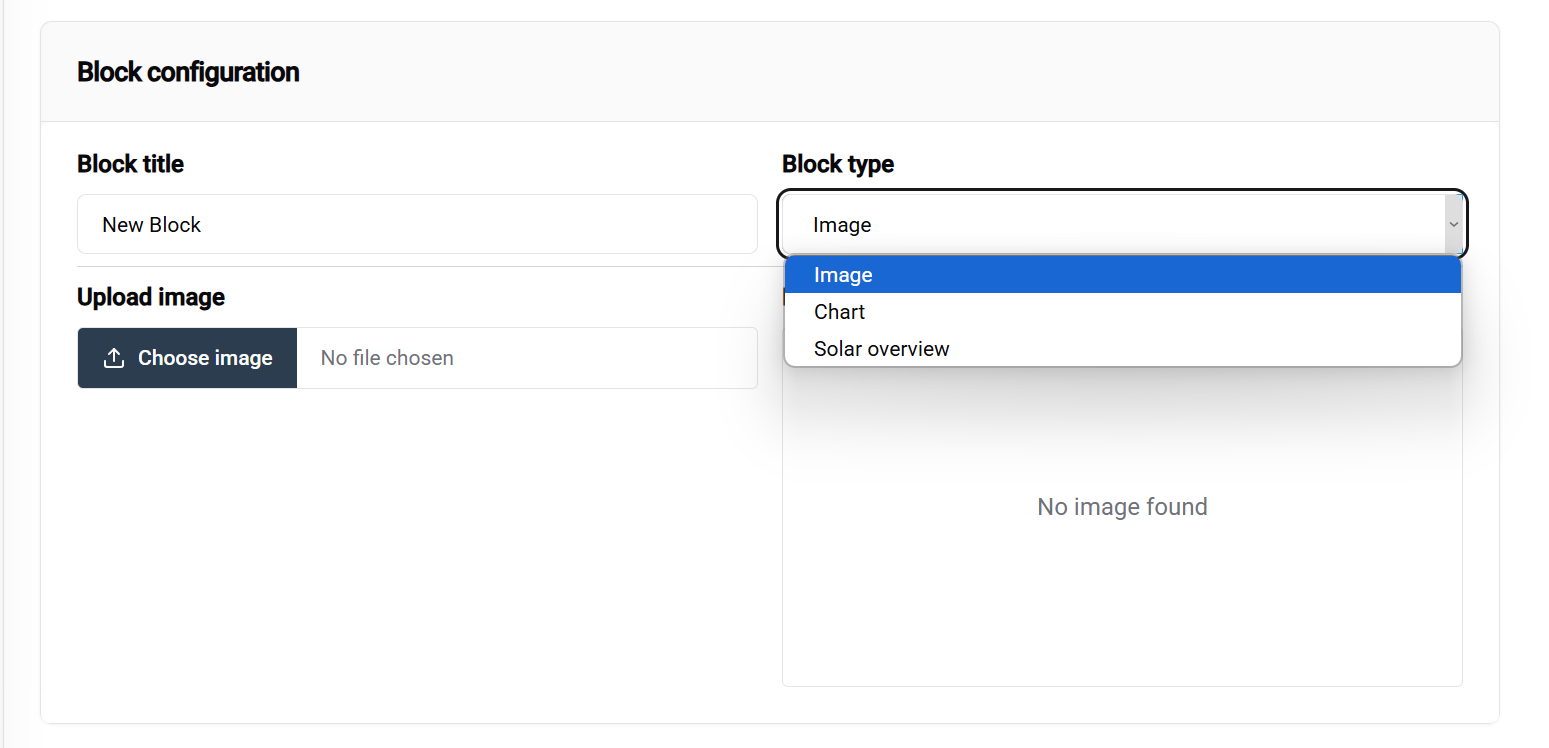
Configuration workflow:
- Select a block to view its options
- Choose block type from the dropdown menu (most important setting)
- Configure block-specific settings in the bottom panel
📚 Learn More: Detailed information about different block types is available in the Public display Template documentation.
Example Template Configuration
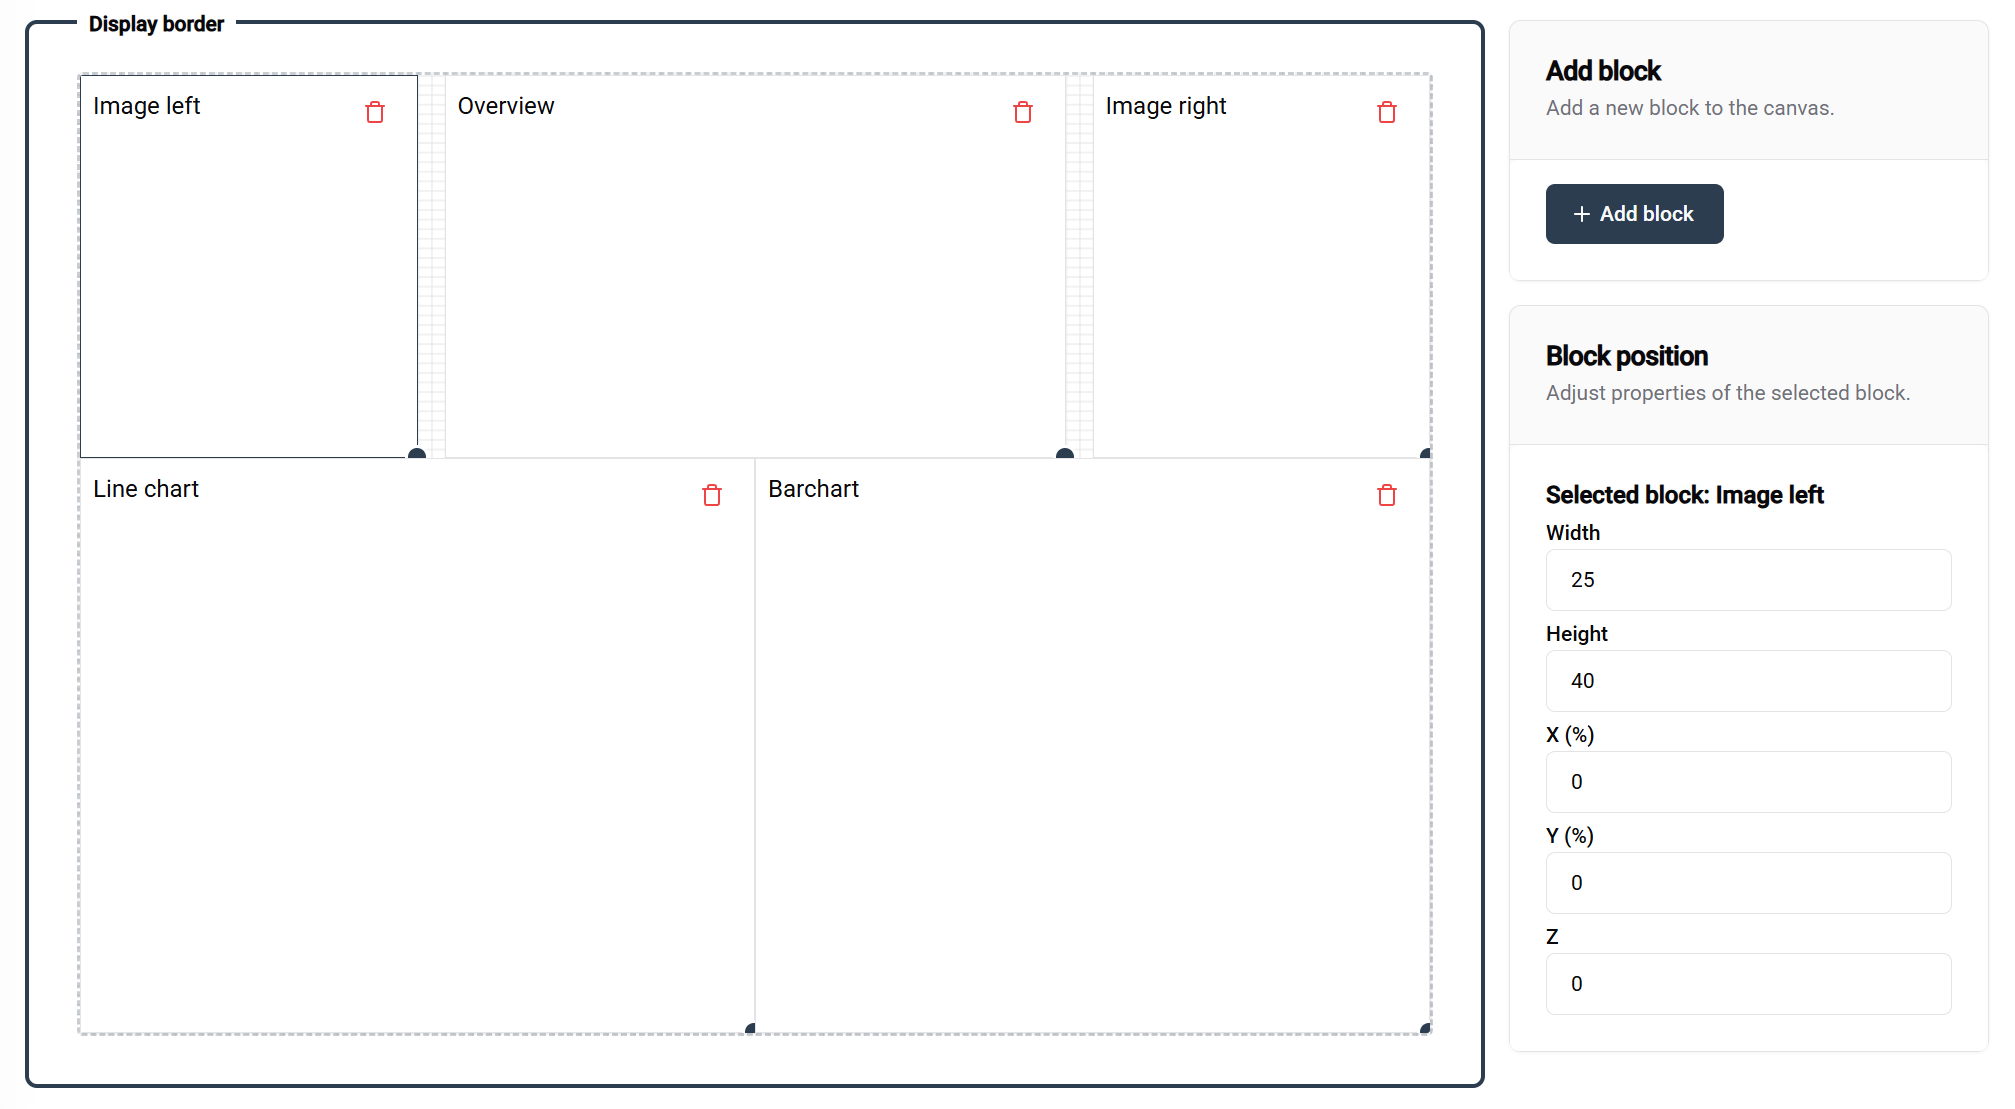
This example demonstrates a complete template setup with labeled blocks showing their respective configurations and purposes.
💾 Saving your template:
- Click the save button (top-right corner) when satisfied with your design
- Your template becomes available for use in configurations
Template Overview
✅ Template created successfully! Your new template now appears in the management table, ready for:
- ✏️ Further editing
- 🗑️ Deletion if needed
- ⚙️ Configuration in the next step
3. Public display Configuration
📖 For detailed configuration options, visit the Public display Configuration documentation page.
In this final step, you'll apply your template to a specific installation and optionally link it to your claimed controller.
🎯 Outcomes after completion:
- With controller: View your public display on the physical display device
- Without controller: Preview how your public display will look when deployed
🧪 Testing Advantage: You can prepare and test templates and configurations before linking them to controllers, ensuring everything works perfectly before deployment.
Accessing Configuration
Navigation steps:
- Go to your installation overview page
- Select an installation or controller from the list
- Choose 'Public display' from the popup menu
Configuration Management
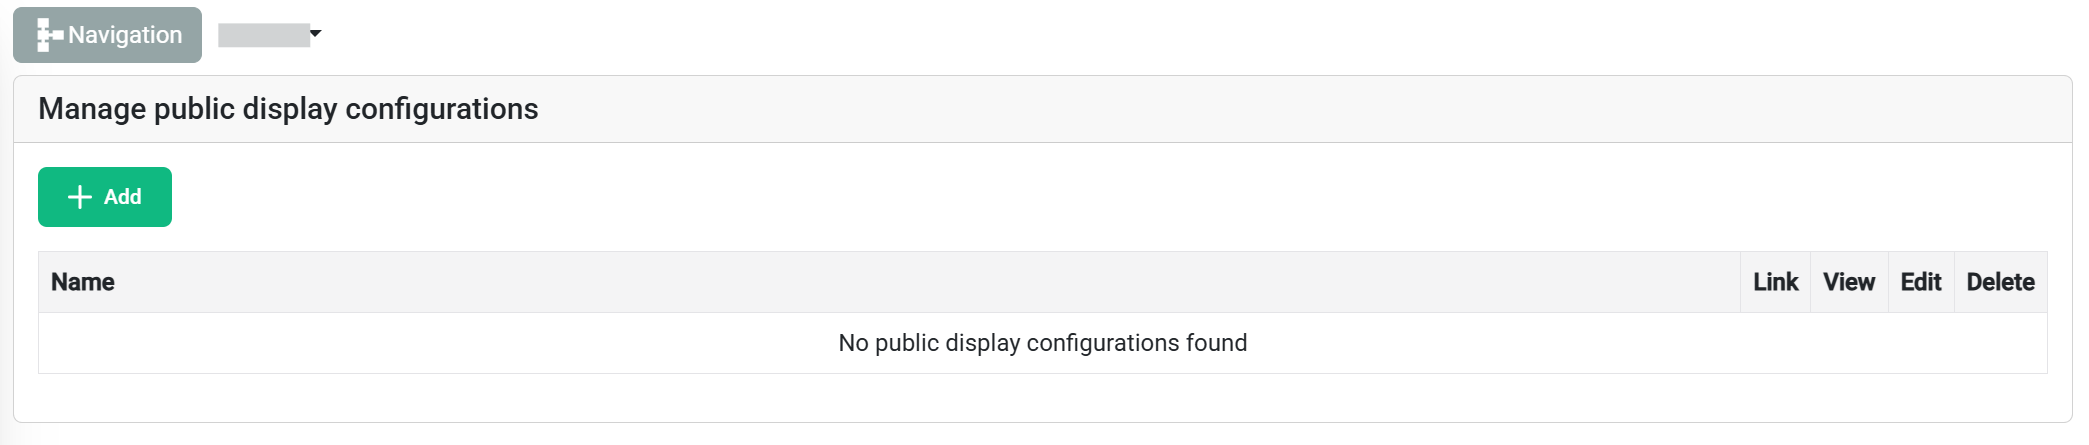
The configuration table shows:
- 📋 All existing configurations for the selected installation
- ➕ Add new configuration button (top-left corner)
Creating a New Configuration
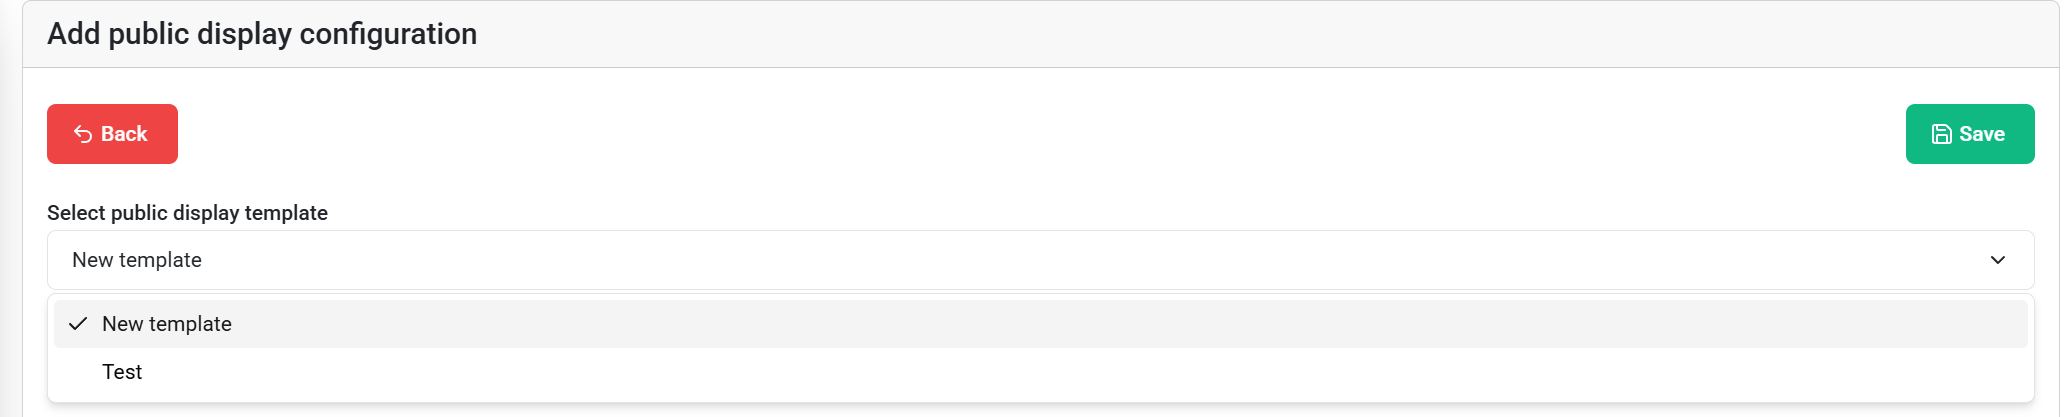
Configuration setup:
- Select template from the dropdown menu
- Choose your previously created template
- Review available blocks and their editable properties
Block-Specific Configuration
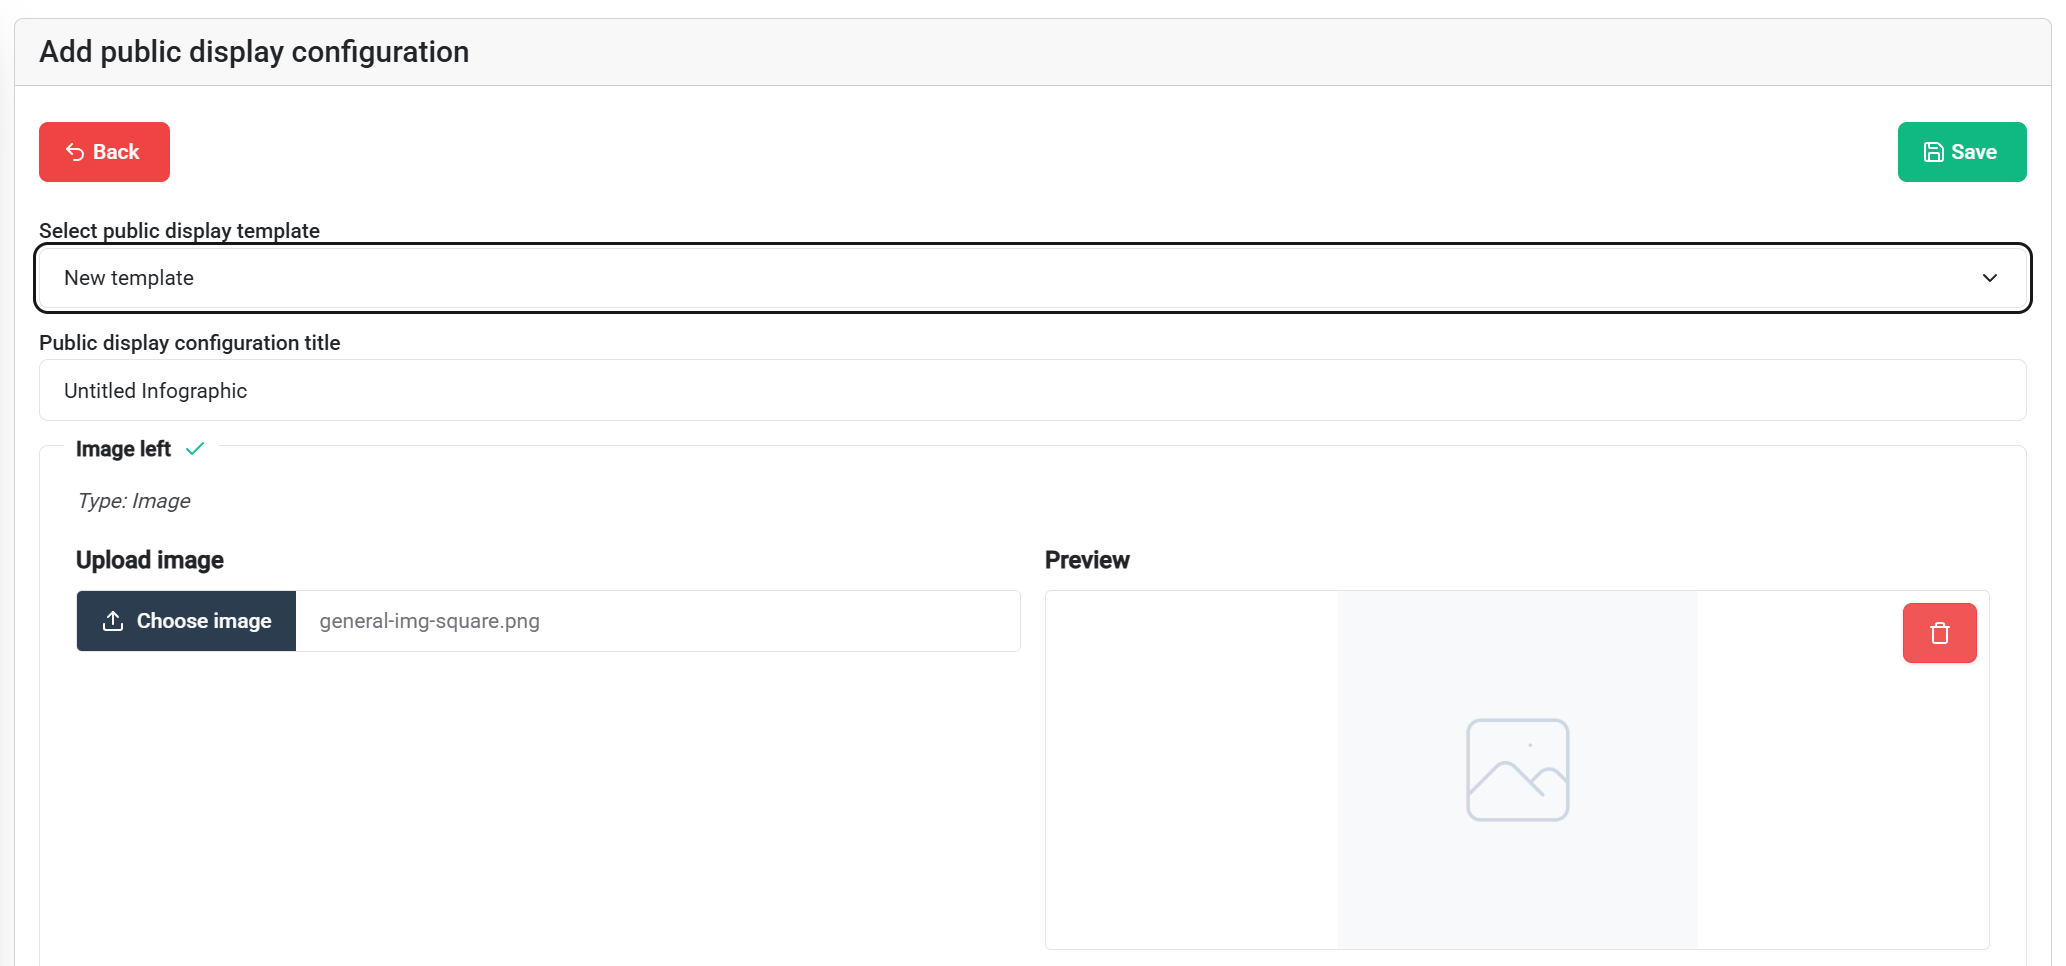
Configuration options:
- Not all blocks are currently configurable. This will change as development continues.
- Pre-filled content from templates can be used as-is or customized
- Override default settings with installation-specific content
💡 Tip: Standard images from templates provide a baseline - customize only what needs to be installation-specific.
💾 Save your configuration using the top-right save button when ready.
Configuration Actions

Available actions for saved configurations:
- 🎛️ Claim Controller - Link to hardware device
- 👁️ View - Preview the final result
- ✏️ Edit - Modify configuration settings
- 🗑️ Delete - Remove configuration
Preview Your Public display
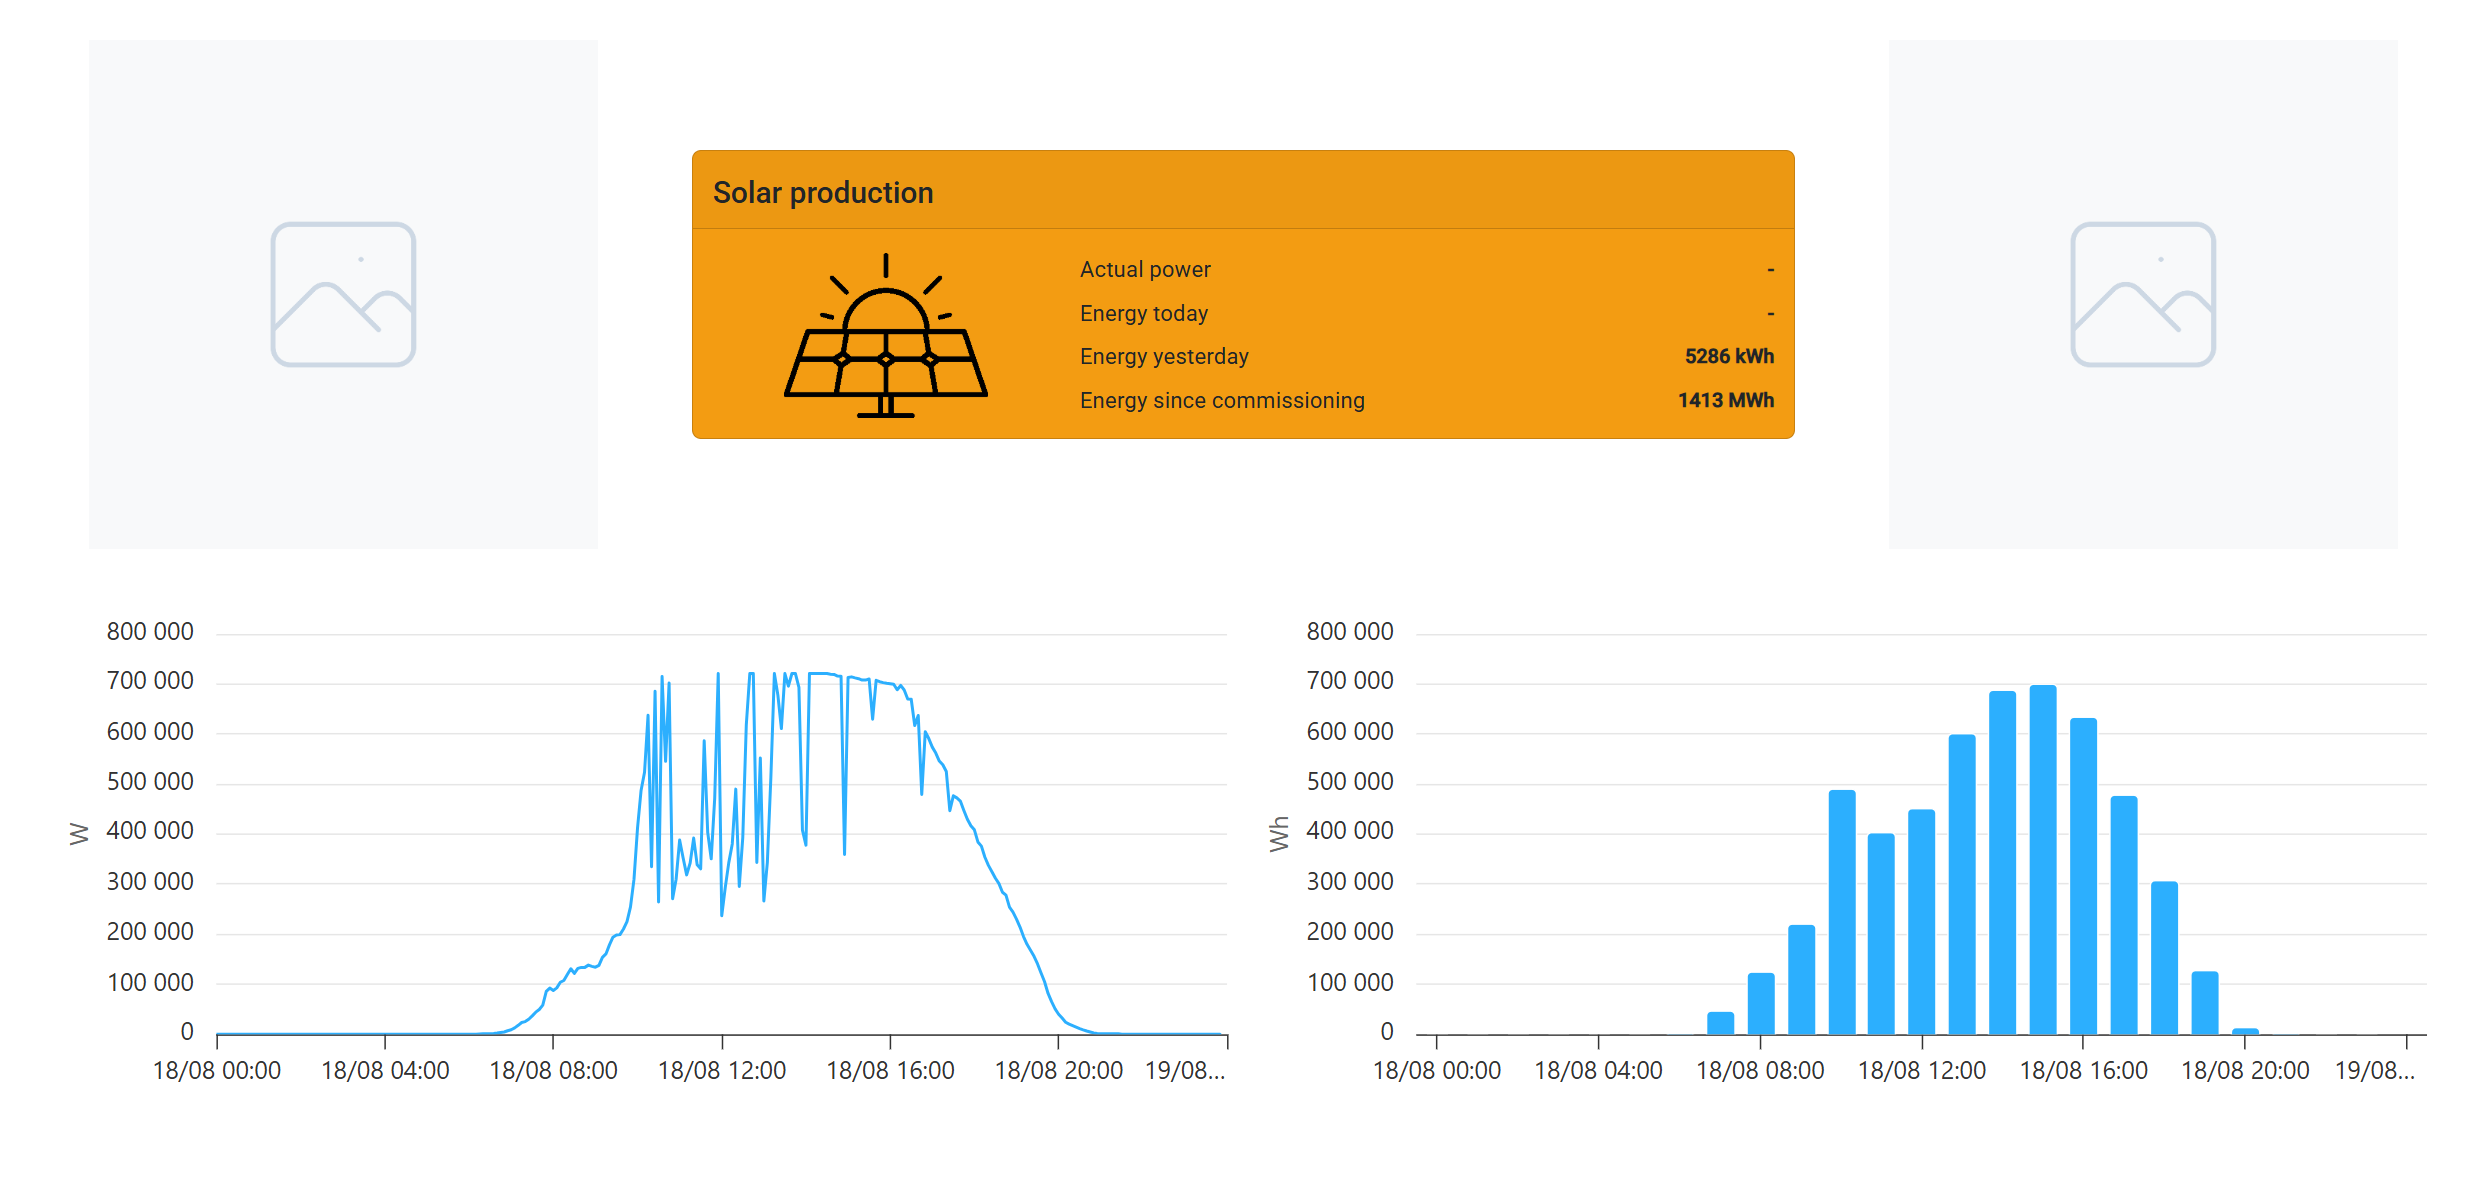
Preview features:
- Real-time visualization of how the public display will appear on the controller
- Responsive testing - resize your browser window to see how the layout adapts to different screen sizes
- Final validation before controller deployment
Linking to Controller
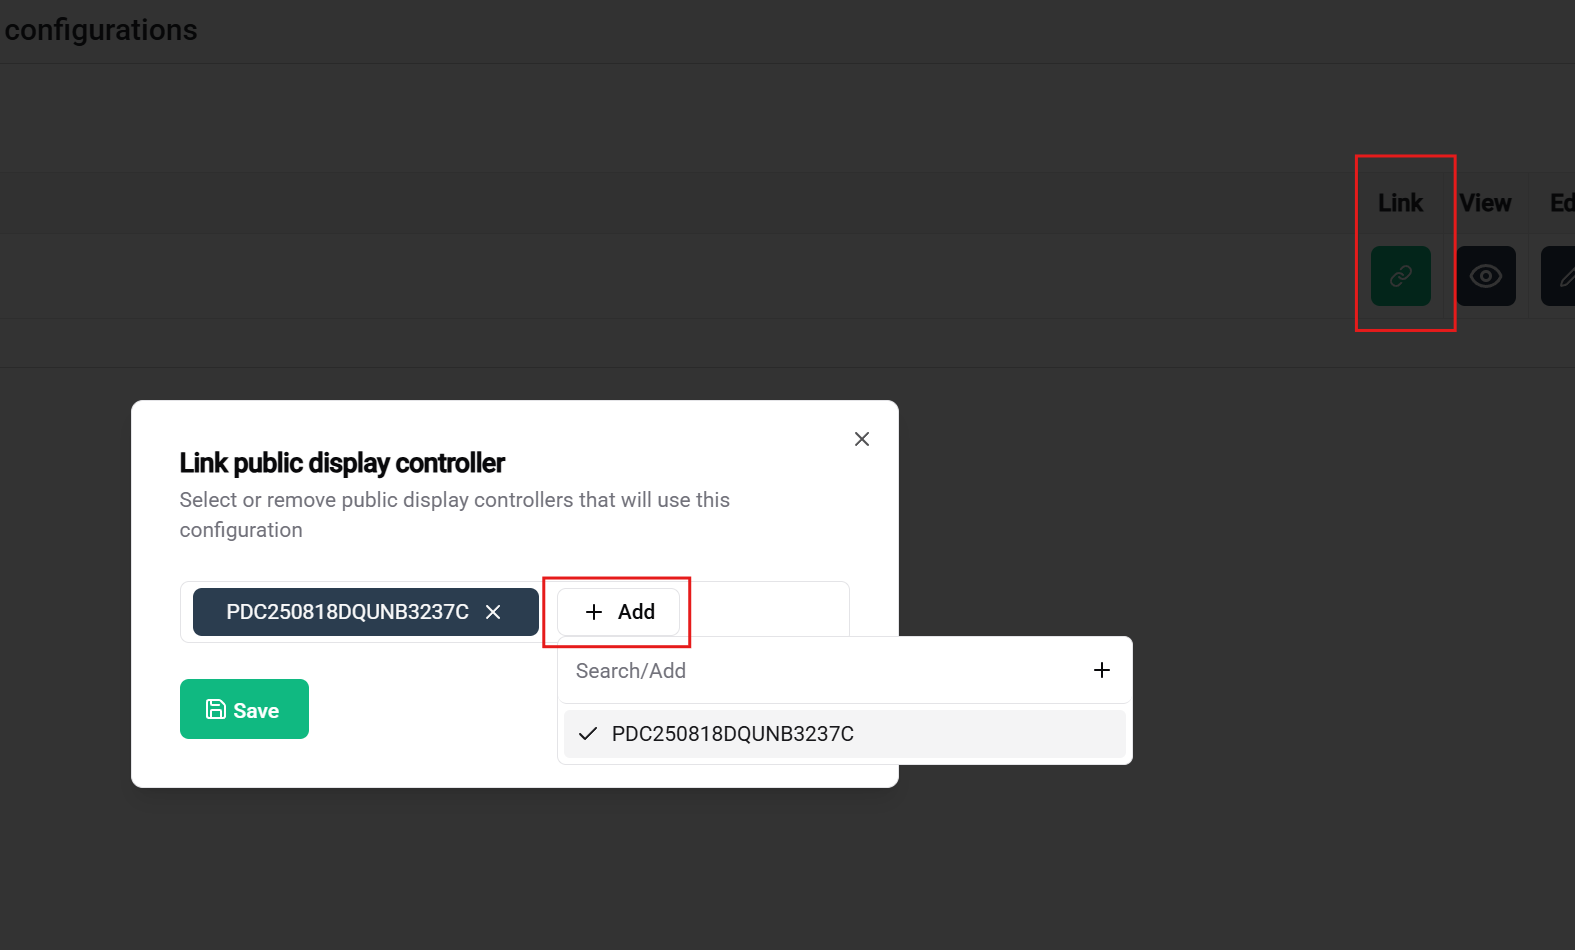
Final deployment step:
- Return to the configuration table
- Click 'Claim Controller' to link your configuration
- Complete the setup by connecting the physical controller
🎉 Success! Once everything is configured, linked, and the controller is connected, your custom public display will display on the screen.
🎉 Conclusion
Congratulations! You have successfully set up a complete public display system in SmartgridX.
What You've Accomplished
✅ Controller Management - Claimed and registered your public display hardware
✅ Template Design - Created a reusable visual layout
✅ Configuration Setup - Applied your template to a specific installation
✅ System Integration - Connected all components for live display
Next Steps
🖥️ Display Ready: Your public display controller can now showcase your custom visualization on any connected screen
📚 Expand Your Knowledge: For advanced features and detailed customization options, explore the comprehensive documentation pages for each component
💬 Need Help? Our support team is available for questions, feature requests, or troubleshooting assistance
📚 Related Documentation
Next Steps
After successfully claiming your controller:
- 🎛️ Link Controllers - Connect to display hardware
- 📐 Create Templates - Design your visual layouts
- ⚙️ Configure Displays - Apply templates to installations
🚀 Ready to create more? You can now design additional templates and configurations to suit different installations and use cases!